Table of Contents
- 1. Missing or Damaged Shingles
- 2. Granule Loss and Excessive Shingle Wear
- 3. Curling, Buckling, or Creased Shingles
- 4. Water Stains on Ceilings and Walls
- 5. Damaged or Loose Flashing Around Chimneys and Vents
- 6. Sagging Roof Deck and Structural Issues
- 7. Debris Buildup in Gutters and Attic Moisture
- Roof Inspection Checklist for Homeowners
Last Updated: August 9, 2026
According to the National Association of Home Builders, roof damage claims represent one of the fastest-growing categories in homeowner insurance across the Midwest. Understanding early signs of roof damage could save you thousands in repair costs and prevent serious structural issues. This guide from DGK Home Solutions covers the seven most common indicators that your roof needs professional attention, along with practical steps to assess damage and document it for insurance claims.
1. Missing or Damaged Shingles
Missing or damaged shingles are the most visible sign of roof compromise. When shingles are cracked, torn, or absent, the underlying layers become exposed to water infiltration, leading to rot, mold, and structural decay.
Inspect your roof from the ground using binoculars or a safe vantage point. Look for gaps where shingles should be or shingles that appear cracked or peeling. Document damage with photos from multiple angles before attempting repairs. For temporary protection, apply rubberized wet patch sealant to exposed areas, but professional replacement should happen within days to prevent water damage from spreading into your attic and walls.
Missing shingles expose the felt underlayment and roof deck to moisture. Even one missing shingle can allow water to penetrate 10-15 feet into surrounding areas. Delaying repair invites attic rot and mold growth that costs far more than the original shingle replacement.
2. Granule Loss and Excessive Shingle Wear
Asphalt shingles are coated with granules that protect the underlying asphalt from UV damage and weather exposure. As shingles age, these granules wash away, leaving the asphalt vulnerable. Excessive granule loss signals your roof is approaching the end of its serviceable life.
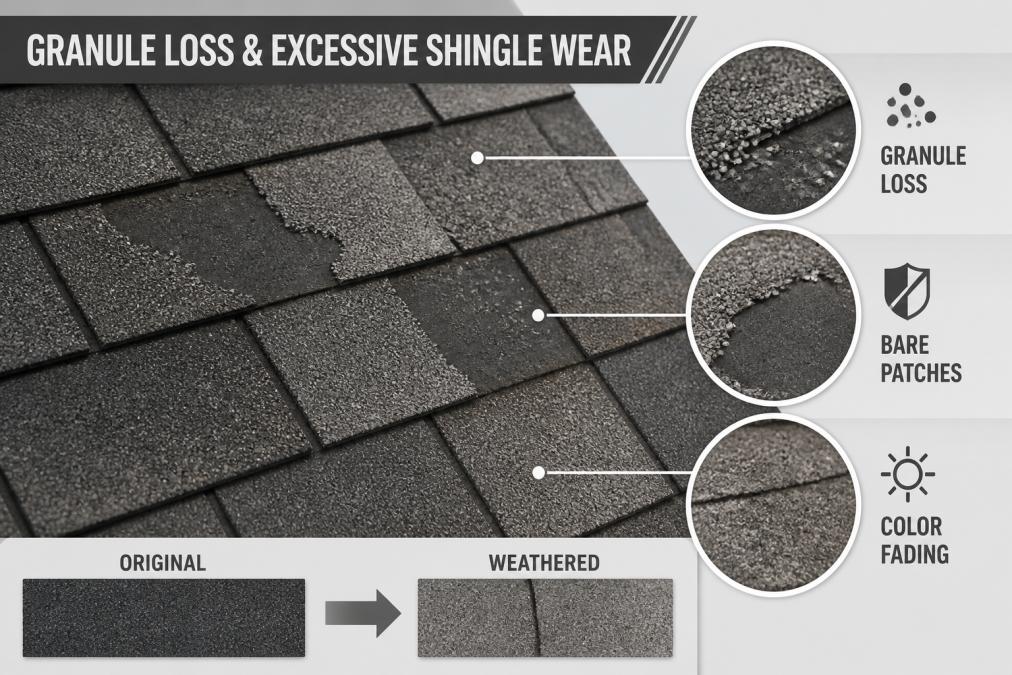
Inspect your gutters and downspouts for dark, sand-like debris accumulation. This granule runoff indicates shingle deterioration. You might also notice lighter or more faded sections of roof, signaling uneven wear and granule loss.
Granule loss doesn’t always mean immediate replacement, but it’s a clear aging sign. If your roof is 15-20 years old with significant granule loss, replacement within 2-3 years is prudent. If your roof is under 10 years old and losing granules rapidly, this could indicate a manufacturing defect or installation issue worth investigating.
Check your gutters after heavy rain or wind. If you find more than a small handful of granules, your roof is shedding faster than normal. This is one of the easiest early-warning signs to spot before more serious damage develops.
3. Curling, Buckling, or Creased Shingles
Shingles that curl at edges, buckle upward, or develop creases are responding to thermal stress and moisture exposure. These deformed shingles lose their ability to shed water effectively and are more vulnerable to wind uplift.
Inspect your roof from a safe distance using binoculars. Look for lifted edges or wavy appearance rather than flat shingles. Isolated curled or buckled shingles can often be sealed back down with roofing cement temporarily. However, if curling or buckling is widespread, replacement is the better long-term solution.
Document curling and buckling with photos for insurance claims if damage resulted from storms. Some policies cover wind damage that causes shingles to curl or buckle.
4. Water Stains on Ceilings and Walls
Water stains on interior ceilings or walls are a red flag that water has penetrated your roof and entered your attic or wall cavities. These stains may be brown, yellowish, or greenish depending on mold or mineral deposits.
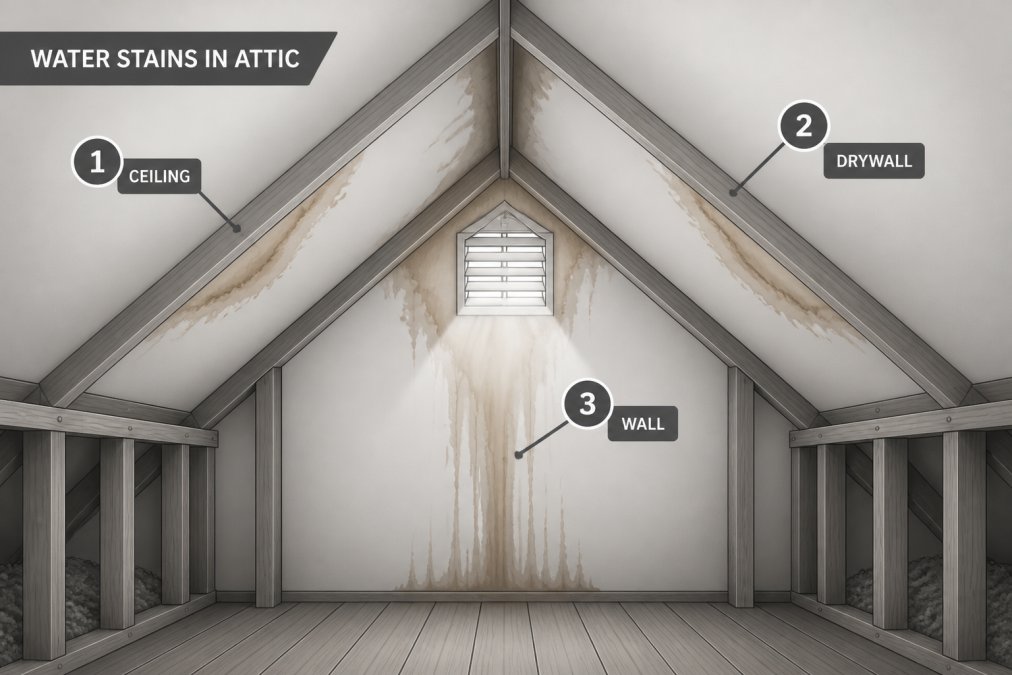
Check your attic after rain or snow melt, particularly in corners and along the roof line. A musty smell in your attic indicates active water intrusion. If you notice water stains, identify the source immediately. Water doesn’t always drip straight down; it can travel along roof framing before appearing on your ceiling.
Document water stains with photos and note when they first appeared. This timeline is important for insurance claims. If stains are fresh and related to recent storms, your homeowner’s insurance may cover roof repair and some water damage remediation.
Active water stains indicate ongoing water infiltration. The longer you delay addressing roof damage, the more structural damage accumulates. Mold remediation and framing repair can cost 10 times more than the original roof repair. Act immediately when you discover water intrusion.
5. Damaged or Loose Flashing Around Chimneys and Vents
Flashing is the metal trim that seals gaps where your roof meets vertical structures like chimneys, vent pipes, skylights, and wall penetrations. When flashing is damaged, loose, or improperly sealed, water runs directly into these gaps and into your home. Flashing failures are one of the most common sources of roof leaks.
Inspect flashing around your chimney and vent pipes from the ground using binoculars. Look for gaps between flashing and roof, visible rust or corrosion on metal flashing, or caulking that has cracked and separated. Flashing should be tightly sealed with roofing cement or caulk and overlap shingles above it so water runs down and away.
If you spot loose or damaged flashing, temporary sealing with roofing cement can buy time, but professional replacement is the proper fix. Flashing should be re-sealed or replaced every 15-20 years as part of routine maintenance.
Flashing around chimneys and vents is often where roof leaks start. If you’ve had a roof leak, it was likely a flashing failure. Inspecting and maintaining flashing is one of the most cost-effective preventative measures you can take.
6. Sagging Roof Deck and Structural Issues
A sagging or visibly drooping roof line is a serious structural problem requiring immediate professional assessment. Roof sagging indicates the underlying roof deck or support structure is compromised from water damage, inadequate support, or age-related deterioration.
From ground level, look at your roofline against the sky. It should appear straight and level. If you notice a dip or sag, or if the roof appears to have lost its pitch, this is a structural concern beyond roof surface damage.
Sagging roof decks are dangerous because they indicate failing roof structure at risk of collapse under heavy snow load or additional damage. Hire a professional structural engineer or experienced roofing contractor to assess severity. Document sagging with photos and contact your insurance company immediately. Structural damage from weather events is often covered.
7. Debris Buildup in Gutters and Attic Moisture
Clogged gutters and roof debris accelerate roof deterioration. When gutters are blocked with leaves, twigs, and granules, water backs up and sits on your roof instead of draining. This standing water accelerates shingle breakdown and creates ideal conditions for mold and mildew.
Inspect gutters and downspouts regularly, particularly in fall and spring. Remove leaves, twigs, and debris by hand or with a gutter scoop. Check that water flows freely through downspouts and discharges 4-6 feet away from your foundation.
Attic moisture relates closely to gutter and roof ventilation issues. Poor ventilation or blocked soffit vents prevent moisture from escaping your attic, allowing humidity to build up. Check your attic for damp insulation, water stains on framing, or musty smells. Ensure soffit vents are clear and your attic has adequate air circulation.
Gutters and attic ventilation are the most overlooked aspects of roof maintenance. Spending 2-3 hours per year on [gutter cleaning and ventilation checks](/gutter-cleaning-experts-fast-affordable-local/) prevents thousands in roof damage. This is the single highest-ROI maintenance task most homeowners can perform.
Roof Inspection Checklist for Homeowners
A systematic approach to roof inspection helps you catch problems early and document damage for insurance claims.
| Inspection Item | What to Look For | Frequency |
|---|---|---|
| Shingles | Missing, cracked, torn, or lifted edges | After storms, twice yearly |
| Granule loss | Excessive granules in gutters or bald spots on shingles | Twice yearly |
| Curling/buckling | Shingles that don’t lie flat or have creases | Twice yearly |
| Flashing | Gaps, rust, loose caulking around chimneys and vents | Twice yearly |
| Gutters | Debris, standing water, proper drainage | Monthly during fall/spring |
| Attic | Water stains, moisture, mold, adequate ventilation | After storms, twice yearly |
| Roof line | Sagging, uneven pitch, structural issues | Twice yearly from ground level |
| Vent pipes | Boots intact, no cracks or separation from roof | Twice yearly |
How to File a Roof Insurance Claim:
Document the damage immediately. Take photos and videos from multiple angles before attempting repairs. Include wide shots showing roof location and close-ups of specific damage.
Contact your insurance company within days. Most policies have time limits for reporting damage. Provide your claim number and damage date.
Request an adjuster inspection. The insurance company will send an adjuster to assess damage and determine coverage. Be present and point out all damage areas.
Obtain repair estimates. Get written estimates from licensed contractors. Many insurers require 2-3 estimates before approving claims.
Submit documentation. Provide photos, adjuster reports, and contractor estimates. Keep copies of all communications.
Work with a reputable contractor. Choose a contractor experienced in insurance claim work. DGK Home Solutions handles insurance claim coordination, reducing stress and ensuring proper documentation.
When to Replace vs. Repair Your Roof:
- Roof age: Roofs over 20 years old are generally better candidates for replacement
- Extent of damage: Isolated damage affecting less than 20% of roof surface is usually repairable; widespread damage justifies replacement
- Cost comparison: If repair costs exceed 50% of replacement cost, replacement is typically better
- Future plans: Replacement adds more value if you plan to sell within 5 years
- Remaining lifespan: A professional can assess remaining service years and recommend the most cost-effective option
A professional roof inspection provides the data you need to make this decision confidently. DGK Home Solutions offers free inspections and honest assessments of whether your roof needs repair or replacement.
Roof damage in Liberty Twp can escalate quickly from minor repair into major structural problems if left unaddressed. The seven signs covered here, missing shingles, granule loss, curling, water stains, flashing damage, sagging, and debris accumulation, are your early warning system. Catching these issues early and addressing them promptly protects your home’s structural integrity and prevents costly water damage.
If you’ve noticed any of these signs, DGK Home Solutions offers free inspections and honest assessments of what your roof actually needs. With over 20 years of experience serving the Greater Cincinnati area, the team provides clear communication, stress-free processes, and expert guidance on insurance claims. Get a free quote today and protect your home with professional roofing expertise.
Frequently Asked Questions
What are the most common signs of roof damage in Liberty Twp?
The most common signs of roof damage include missing or damaged shingles, granule loss (which looks like gravel in gutters), water stains on ceilings, and curling or buckling shingles. Storm damage from high winds and hail is frequent in the Greater Cincinnati area. If you notice any of these, contact a professional for a thorough roof inspection. DGK Home Solutions can assess your roof and document damage for insurance claims.
How often should I inspect my roof for storm damage?
Inspect your roof at least twice yearly: spring and fall. After severe storms, hail, or high winds, inspect immediately or hire a professional. Ohio experiences significant spring storms, so spring inspections are critical. Use a roof inspection checklist to identify granule loss, missing nails, flashing damage, and water infiltration signs. If climbing ladders feels unsafe, professional inspectors can access hard-to-reach areas without risk.
When should I replace my roof instead of repairing it?
Replace your roof if damage covers more than 25% of the roof surface, if the roof is near the end of its lifespan (15-25 years for asphalt shingles), or if multiple areas show structural issues like sagging deck or extensive water damage. Minor damage to a newer roof may warrant repair. Professional contractors can assess whether repair or replacement makes financial sense and help document damage for insurance purposes.
Does homeowners insurance cover roof damage in Liberty Twp?
Most homeowners insurance policies cover sudden, accidental roof damage from storms, hail, and wind. However, coverage depends on your specific policy and the cause of damage. Wear and tear or poor maintenance typically aren't covered. File a claim promptly with photos and documentation. DGK Home Solutions assists with insurance claims by providing detailed inspection reports and damage documentation that adjusters need.
This article was written using GrandRanker