Table of Contents
- Common Signs of Storm Damage on Roof
- How to Safely Inspect Your Roof From Ground
- Interior vs. Exterior Leak Source Identification
- Creating a Roof Storm Damage Inspection Checklist
- How to File a Roof Insurance Claim After Storm Damage
- When to Call a Professional Roofing Contractor
- Common Mistakes to Avoid After Storm Damage
- Conclusion
Signs of Storm Damage on Roof: A Complete Guide
Last Updated: July 14, 2026
When a storm rolls through, your roof often bears the brunt of the impact. Identifying signs of storm damage early can mean the difference between a simple repair and a costly full replacement. At DGK Home Solutions, we’ve helped hundreds of homeowners navigate post-storm assessments and insurance claims over our 20+ years serving the Greater Cincinnati area. This guide walks you through what to look for, how to document damage safely, and what steps to take next.
Most homeowners wait 2-3 weeks after a storm to inspect their roof. Insurance adjusters recommend doing a preliminary assessment within 48 hours while damage is fresh and visible.
Common Signs of Storm Damage on Roof
Storm damage manifests in predictable ways. The distinction between acute storm impact and age-related wear matters for insurance claims.
Missing or Broken Shingles and Tiles
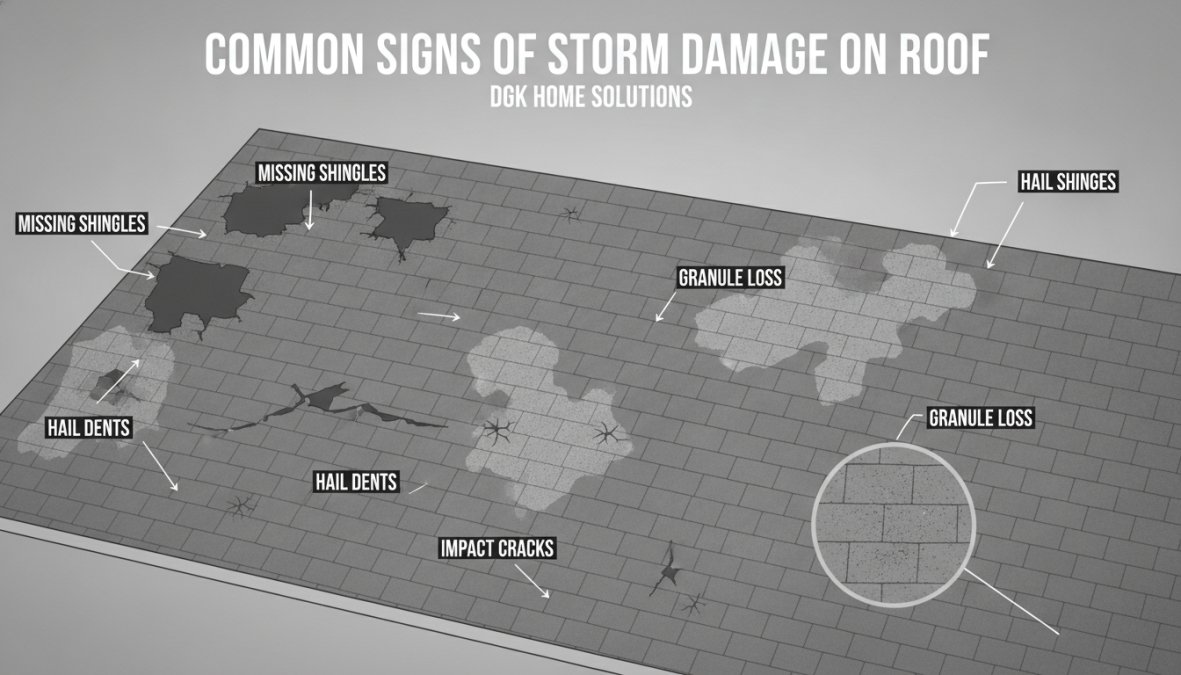
Missing shingles are the most obvious indicator of storm damage. High winds can lift and tear shingles away completely, or leave them hanging at odd angles. Broken or cracked shingles indicate impact damage from hail or debris.
Look for shingles that are completely missing, torn at the edges, cracked, lifted but partially attached, or curling at the corners. If damage is concentrated on one side of your roof (typically the windward side), it’s almost certainly storm-related. Document the pattern with photos from multiple angles.
Tile roofs show similar damage: broken tiles, displaced tiles, or tiles with impact marks.
Hail Damage Indicators
Hail damage is subtler than wind damage but equally destructive. Hail strikes create small dents and bruises in shingles that compromise the protective granule layer, allowing UV rays and moisture to degrade the underlying material.
Signs of hail damage include circular dents or impact marks on shingles, loss of granules, soft spots where the shingle feels spongy, and discoloration where granules are missing. Hail damage is often small and clustered, which helps insurance adjusters confirm storm causation.
Hail damage can take months to become visible. Granule loss accelerates water infiltration, which may not show up as interior damage until the next heavy rain. If you suspect hail damage, photograph everything and file a claim promptly.
Flashing and Pipe Boot Failures
Roof flashing, the metal strips that seal joints and transitions, is extremely vulnerable to storm damage. Wind can bend flashing away from the roof surface, and impact can dent or crack it. Pipe boots (rubber or metal collars around vent pipes) can shift, crack, or separate entirely.
Look for bent, lifted, or separated flashing around chimneys, valleys, or roof edges; cracked or separated pipe boots; exposed nails where flashing was torn away; and gaps between flashing and the roof surface. Flashing damage often requires professional repair because improper sealing can create worse problems than the original damage.
Water Stains and Interior Damage
Interior damage is your first sign that exterior damage has progressed. Water stains on ceilings or attic framing indicate active or recent leaks. Fresh stains (lighter color, wet to the touch) show active leaks. Older stains (dark brown, dry) indicate previous water intrusion.
Look for water stains on ceilings, walls, or attic insulation; discoloration on roof deck or framing; mold or mildew growth; soft or spongy insulation; and sagging drywall. Water can travel along framing or underlayment before pooling in an unexpected location, which is why attic inspection is critical.
How to Safely Inspect Your Roof From Ground
Climbing onto your roof after a storm is risky. Wet surfaces, loose debris, and compromised structural areas create fall hazards. A thorough ground-level inspection catches 80% of visible damage without the safety risk.
What You’ll Need for a Ground-Level Inspection
Gather these tools: binoculars (10x magnification), a camera or smartphone with zoom capability, notebook, ladder, flashlight, safety glasses, and work gloves. Binoculars let you see shingle condition, granule loss, and flashing integrity from 20-30 feet away without climbing.
Step-by-Step Ground Inspection Process
Step 1: Walk the perimeter and assess overall damage (10 minutes)
Stand back 15-20 feet from each side and scan the visible roof surface. Look for missing shingles, visibly bent flashing, and debris. Note which areas show damage and which appear intact.
Step 2: Examine gutters and downspouts (10 minutes)
Use a ladder to safely view your gutters. Look for debris lodged in gutters, bent or separated gutter sections, dents, separated downspouts, and clogged drains. Gutters filled with granules indicate shingle damage above.
Step 3: Use binoculars to examine shingles and flashing (15 minutes)
Stand 20-30 feet from the roof and use binoculars to examine each visible section. Focus on shingle integrity, granule loss, flashing separation or bending, valleys, and roof edges. Take photos of any damage using your smartphone zoom.
Step 4: Inspect your attic (15 minutes)
Use a flashlight to examine the roof deck for water stains, soft spots, or mold; underlayment for dryness and integrity; insulation for water damage; framing for water stains or soft wood; and ventilation areas for blockages.
Step 5: Document everything with photos (10 minutes)
Take photos from multiple angles: wide shots showing overall damage pattern, close-ups of specific damage, interior photos of water stains or attic damage, and photos showing location context.
| Inspection Step | Time Required | What You’re Looking For | Key Red Flags |
|---|---|---|---|
| Perimeter walk | 10 min | Overall damage pattern | Missing shingles, bent flashing |
| Gutters | 10 min | Debris, separation, dents | Granules, bent sections, clogs |
| Binocular scan | 15 min | Shingle/flashing condition | Lifted shingles, bare spots, rust |
| Attic inspection | 15 min | Water intrusion evidence | Stains, mold, soft insulation |
| Photo documentation | 10 min | Visual record of damage | Gaps in coverage, unclear angles |
A single water stain doesn’t require a full roof replacement. Many insurance claims cover targeted repairs, flashing replacement, a few new shingles, underlayment patching, rather than full re-roofing. Document what you see and don’t assume the worst.
Interior vs. Exterior Leak Source Identification
Not every interior water stain comes from roof damage. Identifying the actual source determines whether your homeowners insurance covers the repair.
Roof leaks show specific patterns. Water enters at a high point (damaged shingle, flashing, vent) and travels downward along framing or underlayment. The stain location is often directly below or slightly offset from the entry point.
Non-roof sources include plumbing leaks, condensation, foundation seepage, window or door leaks, and HVAC condensation. To identify the source, trace the water path upward. If the path leads to the roof deck, it’s a roof leak. If the path leads to a plumbing fixture, window, or exterior wall, it’s a non-roof source.
Insurance covers roof storm damage but typically not damage from deferred maintenance, age-related failure, or non-weather sources.
Creating a Roof Storm Damage Inspection Checklist
A systematic checklist ensures you don’t miss damage and creates documentation for your insurance claim.
Pre-Storm Preparation Checklist
- Take baseline photos of your roof (all sides) on a clear day
- Note your roof’s age and material type
- Identify and photograph any pre-existing damage
- Document gutter condition
- Take photos of attic condition
- Keep your homeowners insurance policy accessible
Post-Storm Inspection Checklist
Exterior assessment:
- Walk perimeter and photograph overall damage from ground level
- Note wind direction based on damage pattern
- Examine gutters for debris, separation, or dents
- Use binoculars to scan all visible roof sections
- Document missing, cracked, or lifted shingles with photos
- Photograph flashing around chimneys, vents, and valleys
- Check for bent or separated pipe boots
- Look for granule loss or bare spots on shingles
- Photograph any debris on the roof or in gutters
Interior assessment:
- Inspect attic for water stains on roof deck or framing
- Check for mold or mildew growth
- Examine insulation for water damage
- Verify that ventilation areas are clear
- Walk living spaces and check ceilings for water stains
Documentation:
- Take photos from multiple angles of all damage areas
- Include close-ups showing detail
- Photograph undamaged sections for comparison
- Note the date, time, and weather conditions
- Save all photos in a dedicated folder with clear naming
How to File a Roof Insurance Claim After Storm Damage
Filing an insurance claim requires documentation, timing, and clear communication with your adjuster. The process typically takes 2-4 weeks from initial report to claim approval.
Documentation and Photo Evidence
Your insurance company will request detailed documentation. Provide wide shots showing overall damage pattern, close-ups of specific damage with clear detail, interior photos of water stains or attic damage, and photos showing damage location context. Include written documentation of the date and time of the storm, description of storm conditions, list of all damage found organized by location, and dates of your inspections.
If you’ve hired a contractor for an estimate, provide their report and photos. Detailed photos showing the damage pattern and its relationship to the storm event are more persuasive than verbal descriptions.
Do not make permanent repairs before the adjuster inspects the damage. Insurance companies may deny claims if you’ve already repaired damage they can’t visually assess. Temporary repairs (tarping a hole, removing debris) are fine and often necessary to prevent further damage.
Working With Insurance Adjusters
When the adjuster arrives, provide your documentation package and walk them through your findings. Have all photos and notes organized and clear access to affected areas. During the inspection, show them the damage you’ve documented. After the inspection, ask for a timeline for the claim decision and request written explanation of their assessment.
When to Call a Professional Roofing Contractor
Some damage requires professional assessment. Call a contractor immediately if you see active water intrusion or wet insulation in the attic, notice soft spots or spongy areas on the roof deck, see flashing that is visibly bent, separated, or missing, are uncomfortable climbing a ladder, or your roof is over 20 years old and shows multiple damage points.
A professional assessment costs nothing if you’re filing an insurance claim. Most contractors include it as part of the claims process and provide critical documentation that increases your approval odds.
Common Mistakes to Avoid After Storm Damage
Mistake 1: Waiting too long to inspect
Waiting weeks after a storm means you miss the peak window for damage documentation. Weather exposure and additional rain can obscure the original damage pattern.
Mistake 2: Making permanent repairs before adjuster approval
Permanent repairs before inspection can result in claim denial. The adjuster can’t assess damage they can’t see.
Mistake 3: Underestimating interior damage
Water intrusion often progresses slowly. A small attic stain today becomes mold and structural damage in months. Document all stains and include them in your claim.
Mistake 4: Failing to photograph everything
Photos are your proof. Without them, you’re relying on the adjuster’s assessment. Detailed photos give you recourse if you need to appeal a decision.
Mistake 5: Hiring a contractor before filing a claim
Get your insurance claim filed first. Once approved, your contractor can begin work with clear authorization.
Mistake 6: Not documenting pre-existing damage
Being transparent about what was already damaged vs. what’s new from the storm strengthens your credibility.
Mistake 7: Ignoring gutter and drainage damage
Gutters and downspouts are part of your roof system. Damage here causes water to pool, leading to roof leaks. Include gutter damage in your claim documentation.
Storm damage assessment doesn’t have to be overwhelming. A systematic inspection from the ground, combined with detailed documentation, gives you everything you need for a successful insurance claim. Act quickly, document damage within 48 hours, file your claim promptly, and work with a professional contractor who understands the claims process. DGK Home Solutions has guided hundreds of homeowners through this process over our 20+ years in the Greater Cincinnati area. We provide free damage assessments, handle insurance coordination, and deliver professional repairs with the materials and workmanship your home deserves.
Frequently Asked Questions
What does storm damage look like on a roof?
Storm damage on roofs typically appears as missing or broken shingles, dents or dimples from hail, cracked or curling shingles, granule loss (dark streaks in gutters), damaged flashing around chimneys and pipes, and bent gutters or downspouts. Water stains on ceilings and attic moisture also indicate storm-related roof damage. The severity depends on wind speed, hail size, and your roof's age and condition.
How do I document roof storm damage for my homeowners insurance claim?
Photograph all visible damage from multiple angles, including close-ups and wide shots showing the roof's overall condition. Document water stains, missing shingles, flashing damage, and gutter issues. Keep receipts for any emergency repairs, note the storm date and weather conditions, and create a written inventory of damaged areas. Contact your insurance company promptly and provide all photos and documentation. A professional roof storm damage inspection checklist helps ensure you don't miss critical evidence.
Can you see roof damage from the ground?
Yes, many signs of storm damage are visible from the ground using binoculars or a camera with zoom. Look for missing shingles, obvious gaps, bent flashing, damaged gutters, and debris in downspouts. However, not all damage is visible from below, some hail damage and underlayment issues require closer inspection. For a thorough assessment, it's safest to use a professional roofing contractor who can safely access the roof and identify damage you might miss from ground level.
What should I do immediately after a storm if I suspect roof damage?
First, ensure safety, do not climb onto your roof if it's wet or unstable. Document any visible damage with photos from ground level. Check your attic for water stains, leaks, or moisture. Contact your homeowners insurance to report the damage and schedule an adjuster inspection. Avoid making permanent repairs until the adjuster has assessed the damage, as this may affect your claim. If there's active leaking, use emergency tarping or contact a professional roofer for temporary protection.
This article was written using GrandRanker