Table of Contents
- Can You Install Siding Over Existing Wood Siding?
- Signs of Rot Under Wood Siding to Check Before Installation
- What You’ll Need: Tools and Materials for the Job
- Step-by-Step Process to Install Siding Over Wood
- Cost to Remove Old Wood Siding vs. Installing Over It
- Best Siding Materials for Homes in Your Area
- Common Mistakes to Avoid When Installing Over Existing Siding
- Frequently Asked Questions
Last Updated: September 4, 2026
Can You Install Siding Over Existing Wood Siding?
Yes, you can install siding over existing wood siding in most cases, and it’s a practical option that saves time and money compared to complete removal. At DGK Home Solutions, we’ve helped homeowners across the Greater Cincinnati area make this decision after assessing their specific situations. The key is determining whether the wood underneath is sound enough to support new material.
Installing over existing siding works when the foundation is solid. The old siding acts as a base layer, and new material attaches directly to it. However, this approach only succeeds if rot, decay, or structural damage hasn’t compromised the underlying wood. Before committing to this method, a thorough inspection is non-negotiable.
Signs of Rot Under Wood Siding to Check Before Installation
Rot and decay are the primary reasons installation over existing wood siding fails. You must identify these problems before starting work, or you’ll be covering up damage that will worsen over time.
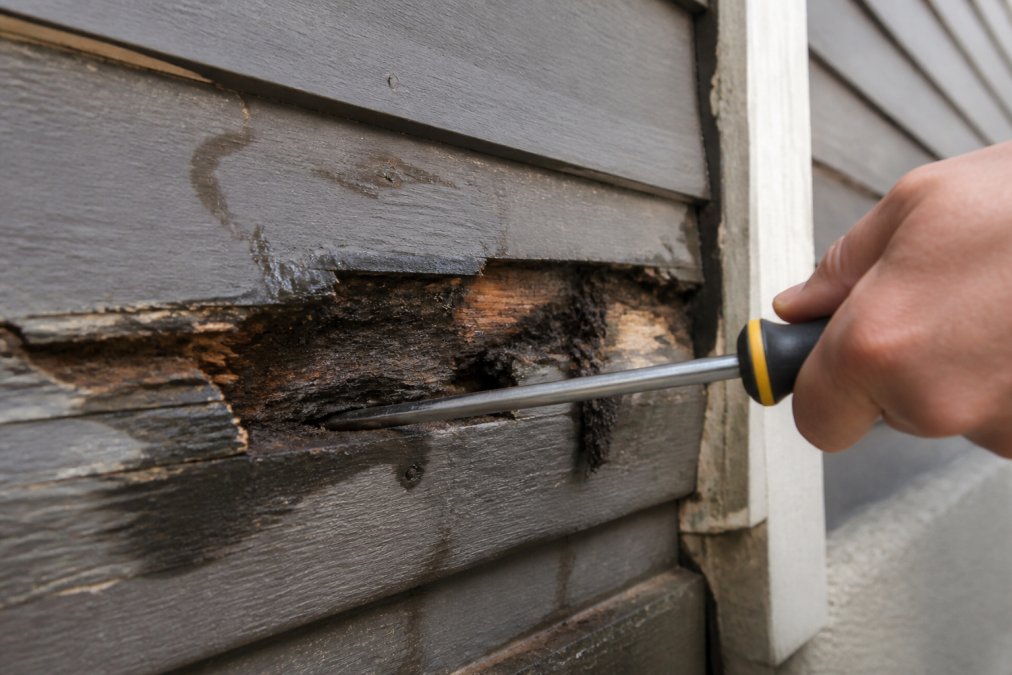
Look for soft spots when you press a screwdriver or awl into the wood. Sound wood resists penetration; rotted wood accepts it easily. Discoloration, especially dark staining or uneven patches, signals moisture damage. Peeling paint or paint that bubbles away from the surface indicates water has penetrated the wood. Check corners, areas near gutters, and spots where siding meets trim, these collect moisture and decay first.
Visible gaps between boards or separation from the house frame mean movement and potential rot behind the surface. If you see insect damage, woodpecker holes, or soft, crumbling texture when you touch the wood, the structural integrity is compromised. Any of these signs means you should remove the old siding rather than cover it. Installing new material over rotted wood is temporary at best and creates a false sense of protection.
What You’ll Need: Tools and Materials for the Job
Proper preparation requires specific tools and materials. Gather these before starting work to avoid delays and ensure a professional result.
Tools:
- Tape measure and level
- Circular saw or miter saw for cutting panels
- Drill or impact driver with bits
- Pry bar and hammer
- Caulking gun
- Safety equipment: gloves, safety glasses, dust mask
Materials:
- New siding panels (vinyl, fiber cement, or composite)
- Moisture barrier or house wrap
- Underlayment material
- Fasteners appropriate for your siding type
- Flashing for windows, doors, and trim
- Caulk and sealant
- Starter strips and trim pieces
The specific materials depend on your siding choice. Vinyl requires different fasteners than fiber cement. Underlayment thickness varies by climate and local building codes. When planning your project, verify what your local jurisdiction requires. Building departments in Liberty Twp and surrounding areas have specific guidelines about moisture barriers and ventilation.
Step-by-Step Process to Install Siding Over Wood
Step 1: Inspect and Repair Damaged Areas
Walk the entire exterior of your home and document every area where the existing siding shows problems. Mark soft spots, cracks, and areas where water has entered. You’re not removing all the old siding, you’re preparing a stable base for new material.
If you find localized rot, remove and replace only that section. Cut out the damaged area with a saw, replace the wood with new material, and let it dry completely. Seal any exposed wood with primer. This targeted repair takes time but prevents future problems under your new siding.
Step 2: Clean and Prepare the Surface
Dirt, algae, and debris prevent proper adhesion and create gaps where moisture can hide. Wash the entire surface with a pressure washer on a low setting, high pressure can damage the old siding. Allow everything to dry completely, typically 24-48 hours depending on weather.
Inspect the cleaned surface again. Now that it’s clean, you may spot damage you missed before. Address any new concerns before moving forward. Loose boards should be secured or replaced. Protruding nails should be driven flush or removed.
Step 3: Install Moisture Barriers and Underlayment
This step is critical and often rushed. A proper moisture barrier prevents water from reaching the old siding and the house structure. Install house wrap or felt underlayment over the entire cleaned surface. Overlap seams by at least 6 inches and secure with staples spaced every 12-16 inches.
At windows, doors, and trim, wrap the underlayment carefully to direct water down and away from openings. Flashing at these points works with the underlayment to create a complete water management system. This is where professional installation makes a measurable difference, improper underlayment leads to moisture problems years later.
Step 4: Measure and Cut New Siding Panels
Accurate measurement prevents waste and ensures a professional appearance. Measure each wall section from corner to corner, accounting for windows and doors. Transfer these measurements to your siding material and cut panels carefully.
Most siding requires specific cutting techniques. Vinyl needs a fine-tooth saw blade to prevent cracking. Fiber cement demands proper equipment and dust control. Composite materials have their own requirements. If you’re unfamiliar with cutting your chosen material, test cuts on scrap pieces first.
Step 5: Fasten New Siding Properly
Fasteners must be appropriate for both your siding material and the existing wood underneath. Use fasteners long enough to penetrate the old siding and bite into solid wood, typically 2-2.5 inches (the CDC). Space fasteners according to manufacturer specifications, usually 16 inches on center (osha.gov).
Don’t over-tighten fasteners. Siding needs slight movement to accommodate temperature changes. Over-driven fasteners create stress points where panels crack. Leave approximately 1/8 inch of clearance between fasteners and panels to allow for expansion.
Cost to Remove Old Wood Siding vs. Installing Over It
Removing old siding is labor-intensive and expensive. Complete removal requires disposing of the old material, which adds significant cost. Installing over existing siding eliminates this step, reducing labor time and disposal fees substantially.
However, installation over existing siding isn’t free. You still need underlayment, new material, and fasteners. The savings come from avoiding removal and disposal, not from reducing total material costs. For homeowners in Liberty Twp and surrounding areas, the decision often depends on the condition of the existing wood and budget constraints.
If the existing siding is structurally sound and level, installation over it makes financial sense. If removal is necessary due to rot or severe damage, the cost difference becomes smaller because you’re paying for removal regardless. Get a professional assessment from DGK Home Solutions to understand your specific situation and make an informed decision.
Best Siding Materials for Homes in Your Area
Your material choice affects durability, appearance, and maintenance requirements. Different materials perform differently in local weather conditions.
Vinyl siding is affordable and requires minimal maintenance, making it popular in the region. It withstands temperature swings and resists moisture. Fiber cement offers superior durability and a more traditional appearance. It handles extreme weather well and lasts 25-30 years (the FDA). Composite materials combine benefits of multiple options but cost more upfront.
For homes in Liberty Twp and the Greater Cincinnati area, fiber cement and vinyl both perform well. The choice depends on your budget, aesthetic preferences, and long-term maintenance tolerance. Vinyl requires less maintenance but may need replacement sooner. Fiber cement lasts longer but demands more care during installation.
Common Mistakes to Avoid When Installing Over Existing Siding
The most common mistake is skipping the moisture barrier. Homeowners think the old siding provides enough protection, then face water damage years later. Every installation over existing siding needs a complete underlayment system.
Another frequent error is installing over unsound wood. Rushing the inspection step leads to covering rot, which continues spreading underneath. The new siding looks fine while damage accelerates behind it. By the time problems appear, significant structural damage has occurred.
Improper fastening causes premature failure. Too-tight fasteners stress panels. Fasteners spaced too far apart allow panels to flex excessively. Using the wrong fastener type for your material creates compatibility problems and corrosion.
Neglecting flashing at windows and doors is another costly mistake. Water enters at these points and migrates into wall cavities. Proper flashing, installed before new siding, prevents this damage. This detail separates professional installation from DIY attempts.
Installing siding over existing wood siding is achievable when the foundation is sound and moisture protection is comprehensive. The process requires careful inspection, proper preparation, and attention to detail at every step. DGK Home Solutions has completed many of these projects across the Greater Cincinnati area, and our team knows how to assess whether your home is a candidate for this approach. We provide honest assessments of your existing siding, recommend the best material for your climate, and handle installation with the precision that protects your home long-term. Get a free quote from DGK Home Solutions and let our 20+ years of experience guide your siding project.
Frequently Asked Questions
Is it safe to install siding over old wood siding?
Installing siding over existing wood siding is generally safe if the underlying wood is structurally sound and free of rot. However, moisture trapped between layers can cause problems over time. The key is proper preparation: inspect for rot, repair damaged areas, install moisture barriers, and ensure good drainage. If rot or water damage is present, remove the old siding first. Professional inspection before installation helps identify hidden issues and prevents costly repairs later.
What are the main risks of installing siding over wood?
The primary risks include moisture accumulation, hidden rot spreading, and reduced wall durability. If water gets trapped between the old and new siding, it can cause the wood underneath to decay and compromise your home’s structural integrity. Pests may also nest in gaps. Additionally, you lose the opportunity to inspect and repair the underlying wood. Building codes in some areas may require removal of damaged siding before installation. Always have the existing siding inspected by a professional to assess these risks before proceeding.
Do I need to remove old wood siding before installing new siding?
Removal is not always necessary, but it depends on the condition of your existing siding. If the wood is solid, not rotting, and properly attached, you can install new siding over it. However, removal is recommended if you find rot, extensive damage, or moisture problems. Removal also gives you a chance to inspect the sheathing and house wrap underneath. Many professionals recommend removal for a longer-lasting installation, especially if your siding is nearing the end of its lifespan or shows signs of deterioration.
What building codes apply to siding installation in Ohio?
Ohio follows the International Building Code (IBC) and state-specific amendments for residential siding installations. Requirements cover fastening patterns, spacing, underlayment, and flashing to prevent water intrusion. Local jurisdictions in Liberty Twp and surrounding areas may have additional requirements. Proper installation over existing siding must maintain structural integrity and moisture protection. A professional contractor familiar with local codes ensures your installation meets all requirements and passes any necessary inspections. Contact your local building department for specific code details before starting your project.
This article was written using GrandRanker