Table of Contents
- What Roof Flashing Does and Why Damage Matters
- Visual Signs of Roof Flashing Damage
- How a Roof Flashing Leak Develops
- Roof Inspection Checklist for Flashing Damage
- When Roof Flashing Repair or Replacement Is Needed
- Professional Roof Flashing Replacement Options
- Common Mistakes When Inspecting Flashing Damage
- Frequently Asked Questions
Last Updated: October 8, 2026
What Roof Flashing Does and Why Damage Matters
Roof flashing is the metal strips that seal gaps where your roof meets walls, chimneys, vents, and other structures. Think of it as your roof’s waterproofing system. When flashing fails, water finds its way inside. That’s when expensive damage starts.
At DGK Home Solutions, we’ve seen countless homes damaged by flashing problems that could have been caught early. Most homeowners don’t realize flashing exists until it fails. By then, the water has already damaged insulation, framing, and drywall.
Identifying roof flashing damage signs early saves thousands in repair costs. A small leak today becomes a structural problem tomorrow. This guide walks you through what to look for and when to call a professional.
Flashing typically fails before the rest of your roof does. If your roof is 15-20 years old, inspect flashing first, it often needs replacement even if shingles still look good.
Visual Signs of Roof Flashing Damage
The first step is learning what damaged flashing looks like. You don’t need to climb on your roof to spot these issues. Many are visible from the ground or from inside your attic.
Rust, Corrosion, and Discoloration
Rust means the metal is breaking down. Once rust starts, it spreads fast. Orange or brown stains on flashing indicate active corrosion. This is especially common on older steel flashing or in areas with high humidity.
Discoloration also signals trouble. White chalky buildup on aluminum flashing shows oxidation. Black streaks mean mold is growing in moisture trapped by failing flashing. These visual cues tell you water is sitting where it shouldn’t be.
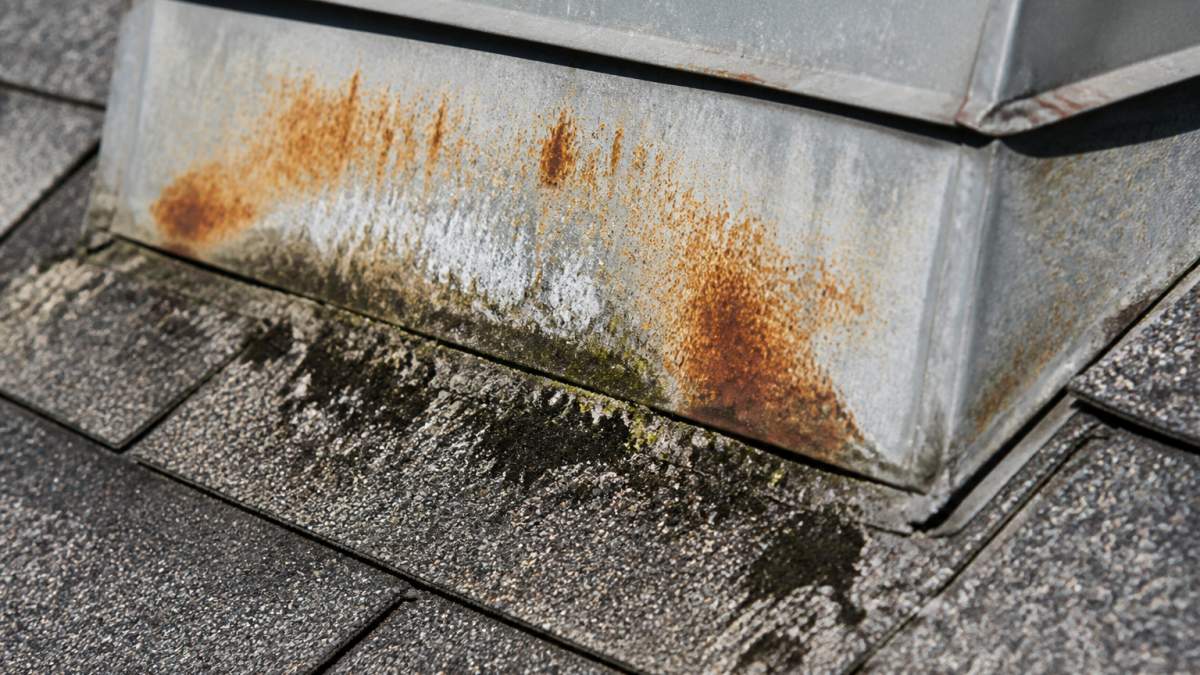
Check around chimneys and vents first. These areas corrode faster because they experience more temperature changes. If you see rust anywhere on flashing, treat it as a warning sign.
Gaps, Cracks, and Separation
Cracks in flashing allow water straight through. Even tiny cracks grow larger as metal expands and contracts with temperature swings. Look for separation where flashing meets the roof or wall, this gap is where leaks start.
Gaps develop because flashing shrinks over time or the sealant fails. The seal around flashing is just as important as the metal itself. Once sealant cracks, water gets in immediately.
Separation is easy to spot from a distance. Look for daylight between the flashing and the surface it’s sealing. In Liberty Twp, freeze-thaw cycles make this problem worse. Metal contracts in cold weather, creating gaps that let water in.
Lifted or Bent Flashing
Flashing should lie flat against the roof. Lifted or bent flashing means water can pool underneath. Even a slight lift creates a pocket where moisture collects.
Bent flashing often results from impact, falling branches, hail, or foot traffic. Once bent, flashing doesn’t seal properly. The metal can’t return to its original shape without professional help.
Check the edges of flashing carefully. Edges that curl up or pull away from the surface are actively failing. This is one of the clearest signs you need repair or replacement soon.
Do not attempt to flatten bent flashing yourself. Forcing metal back into place can crack it or damage the seal further. Always call a professional for bent or lifted flashing.
How a Roof Flashing Leak Develops
Understanding how leaks form helps you catch problems early. Flashing damage doesn’t cause an immediate catastrophic leak. Instead, small amounts of water seep in over weeks or months.
Water enters through cracks, gaps, or rust holes. It runs down the underside of the flashing and soaks into insulation or wood framing. You might not notice anything for a while. Then one day you see a water stain on your ceiling.
By that point, damage has already happened behind the walls. Wet insulation loses its ability to insulate. Wet wood starts to rot. Mold begins growing in hidden spaces.
The longer flashing leaks, the more expensive repairs become. A $500 flashing repair today prevents a $5,000 structural repair tomorrow. This is why early detection matters so much.
Most roof flashing leaks develop slowly and invisibly. By the time you see water inside your home, the problem has been active for weeks or months. Catch it during inspection before visible damage appears.
Roof Inspection Checklist for Flashing Damage
A systematic inspection catches damage you might otherwise miss. Follow this checklist to evaluate flashing condition around your entire roof.
Before You Climb: Safety and Preparation
Never inspect roof flashing alone. Have someone spot you from the ground. Wear non-slip shoes and use a stable ladder. Better yet, stay off the roof entirely and use binoculars from the ground.
Many flashing problems are visible without climbing. Walk around your home’s perimeter. Look up at the roof line. Check for rust, gaps, and separation from ground level.
If you do climb onto the roof, move carefully. Wet or icy surfaces are slippery. Test your footing before putting weight on each spot. Work during daylight hours only.
Safety essentials:
- Non-slip footwear
- Stable ladder
- A spotter on the ground
- Clear weather (no rain, ice, or high wind)
- Daylight hours only
What to Check and Where
Flashing appears in specific locations. Inspect each one systematically. This ensures you don’t miss problem areas.
| Location | What to Look For | Why It Fails |
|---|---|---|
| Chimneys | Rust, separation, cracks around base | High temperature changes, exposure |
| Roof vents | Gaps, lifted edges, cracked sealant | Vibration, settling, age |
| Skylights | Separation, water stains, lifted frame | Movement, poor installation, sealant failure |
| Valleys | Debris, rust, gaps in seams | Water concentration, metal fatigue |
| Walls and dormers | Separation, lifted flashing, rust | Settling, movement, weather exposure |
| Gutters | Rust holes, separation from roof | Water pooling, corrosion, age |
Start at the highest point and work down. Document what you see with photos. Note the location and type of damage. This information helps professionals understand the scope of work needed.
In Liberty Twp and surrounding areas, pay special attention to north-facing flashing. These areas stay damp longer and corrode faster. Also inspect flashing after heavy storms, impact damage might not be immediately obvious.
When Roof Flashing Repair or Replacement Is Needed
Not all flashing damage requires replacement. Some problems can be repaired. Others demand a complete replacement. Knowing the difference saves money and prevents future leaks.
Repair vs. Replacement: How to Decide
Repair flashing when:
- Sealant has cracked but metal is intact
- Rust is surface-level only
- Flashing is lifted but not bent
- Damage is localized to one small area
Repairs typically involve cleaning, resealing, or minor adjustments. These fixes work well for new or relatively young flashing with isolated problems.
Replace flashing when:
- Rust has created holes in the metal
- Flashing is severely bent or twisted
- Multiple areas show damage
- Flashing is more than 20 years old
- Water is actively leaking inside
Replacement is the right choice when damage is widespread or the metal itself has failed. Old flashing that’s been patched multiple times usually needs full replacement. It’s more cost-effective than repeated repairs.
A professional inspection determines which approach makes sense. The DGK Home Solutions team assesses flashing condition and recommends repair or replacement based on what will actually protect your home long-term.
Homeowners in Liberty Twp preparing to sell their property should replace flashing showing visible rust or separation. Buyers notice these issues during inspection, and flashing replacement increases curb appeal and home value.
Professional Roof Flashing Replacement Options
DIY flashing repair rarely works long-term. Metal work requires precision and proper sealing. Poor installation creates new leaks.
Professional flashing replacement involves removing old flashing, inspecting the underlying surface, and installing new flashing with proper sealant. The work takes skill and experience. One small mistake causes water damage that costs thousands to repair.
When choosing a professional, verify their experience with flashing work specifically. Ask for references from recent flashing jobs. Confirm they warranty their work and stand behind it if leaks develop.
DGK Home Solutions has over 20 years of experience with roofing and flashing replacement. We serve residential and commercial properties across the Greater Cincinnati area. Our team provides honest assessments, clear communication throughout the process, and top-quality materials backed by professional workmanship.
Common Mistakes When Inspecting Flashing Damage
Even careful homeowners miss important signs. Knowing common inspection mistakes helps you avoid them.
Mistake 1: Inspecting only during good weather. Flashing problems are easiest to spot after rain or during wet conditions. Water reveals gaps and separation. Inspect after storms, not just on sunny days.
Mistake 2: Missing flashing in hidden locations. You can’t see all flashing from the ground. Valleys between roof sections, areas under overhangs, and flashing behind gutters often go unchecked. Use binoculars to inspect hard-to-reach spots.
Mistake 3: Confusing flashing damage with normal wear. Minor discoloration doesn’t always mean replacement is needed. Rust spots require attention, but surface oxidation on aluminum is often cosmetic. A professional can distinguish between cosmetic wear and actual damage.
Mistake 4: Ignoring small problems. A tiny crack seems unimportant until water starts leaking. Small gaps grow larger over time. Address minor issues before they become major problems.
Mistake 5: Assuming old flashing is fine. Flashing more than 20 years old has likely lost its seal. Even if it looks okay, the sealant has probably failed. Plan for replacement rather than waiting for visible leaks.
Roof flashing damage doesn’t announce itself with dramatic leaks. It develops quietly, allowing water to damage what’s underneath. Catching damage early through regular inspection prevents expensive structural repairs and keeps your home protected.
Look for rust, corrosion, gaps, cracks, and separation. Check flashing around chimneys, vents, skylights, and walls. Document what you find with photos. When damage appears, get a professional assessment from someone with real experience in your area. DGK Home Solutions offers honest evaluations and quality repairs for homeowners throughout the Greater Cincinnati region. Contact us for a free inspection and quote on any flashing concerns you’ve noticed.
Frequently Asked Questions
What are the most obvious signs of roof flashing damage?
Look for rust or corrosion on metal flashing, visible gaps between the flashing and roof, lifted or bent edges, water stains on ceilings or walls below the flashing, and missing sealant. Discoloration, peeling paint, and cracks in caulking are also red flags. These signs indicate the flashing is no longer creating a watertight seal and needs attention soon.
Can damaged roof flashing cause a roof leak?
Yes. Roof flashing is designed to direct water away from vulnerable joints where the roof meets chimneys, vents, and walls. When flashing fails, water seeps behind it and into your home, causing interior leaks, wood rot, and mold. Even small gaps can allow water penetration during heavy rain or snowmelt, making prompt repair or replacement essential.
Should I repair or replace damaged roof flashing?
Repair works for minor damage like small cracks, lifting edges, or failed sealant if the flashing material itself is still sound. Replacement is necessary if the flashing is severely corroded, has large gaps, is rusted through, or if multiple areas are damaged. A professional inspection determines which approach makes sense for your specific situation and budget.
How often should I inspect my roof flashing?
Inspect your roof flashing at least twice a year, in spring and fall, and after severe storms. Look around chimneys, vents, skylights, and where different roof planes meet. If you notice water stains indoors, ice dams, or visible damage, inspect immediately. Regular checks catch small problems before they become expensive leaks or require full replacement.