Table of Contents
- What You Need Before You Tarp a Roof
- Method 1: Heavy-Duty Polyethylene Tarp With Wooden Furring Strips
- Method 2: How to Secure a Tarp on a Roof Without Nails Using Sandbags
- Method 3: Roofing Nails With Neoprene Washers for High-Wind Areas
- Method 4: Professional Roof Shrink Wrap for Long-Term Protection
- Method 5: Emergency Roof Tarping Services in Cincinnati
- Homeowners Insurance Roof Claim Process in Ohio
- Safety Tips for Tarping a Roof After a Storm
- Frequently Asked Questions
Last Updated: September 10, 2026
What You Need Before You Tarp a Roof
Tarping a roof after a storm is the fastest way to stop water intrusion before permanent repairs begin, and doing it correctly protects both your home and your insurance claim. At DGK Home Solutions, we’ve handled storm damage across Liberty Twp, OH for more than 20 years, and the difference between a tarp that holds and one that fails usually comes down to preparation, not luck.
Before you climb anything, gather these materials:
- Heavy-duty polyethylene tarp (at least 6 mil, sized to overhang every edge by 3-4 feet)
- 1×4 or 2×4 wooden furring strips
- Roofing nails with neoprene washers or 2-inch screws
- Sandbags or weighted bags
- Hammer, drill, utility knife, and work gloves
- Sturdy ladder with stabilizer
The OSHA ladder safety guidance is worth reviewing before you set foot on any roof. Most storm-related injuries we hear about happen during the tarping itself, not the storm.
Never tarp a roof while winds are still above 20 mph or while lightning is within 10 miles. A tarp acts like a sail, and a gust can pull you or the material off the roof.
Method 1: Heavy-Duty Polyethylene Tarp With Wooden Furring Strips
The most reliable way to tarp a roof uses a polyethylene tarp anchored with wooden furring strips. This method works on pitched shingle roofs and holds through moderate wind because the wood distributes pressure across the tarp edge instead of concentrating it at fastener points.
Here’s the process:
- Roll the tarp over the ridge so it drapes down both sides, overlapping the damaged area by at least 4 feet.
- Lay furring strips along the tarp’s edges and over the ridge line.
- Fasten through the wood, tarp, and into the roof deck using roofing nails with neoprene washers.
- Seal any exposed nail heads with roofing cement.
The tradeoff is real: you’re putting holes in the roof deck. On a roof that’s already compromised, that’s usually acceptable. On a newer roof with minor damage, it isn’t. The strips and tarp together typically run under $50 at a hardware store, which is cheap insurance against a flooded ceiling.
Method 2: How to Secure a Tarp on a Roof Without Nails Using Sandbags
Learning how to secure a tarp on a roof without nails matters when you can’t or shouldn’t penetrate the surface, whether because of historic materials, a warranty concern, or a flat roof where fasteners won’t hold. Sandbags solve that problem by using weight instead of hardware.
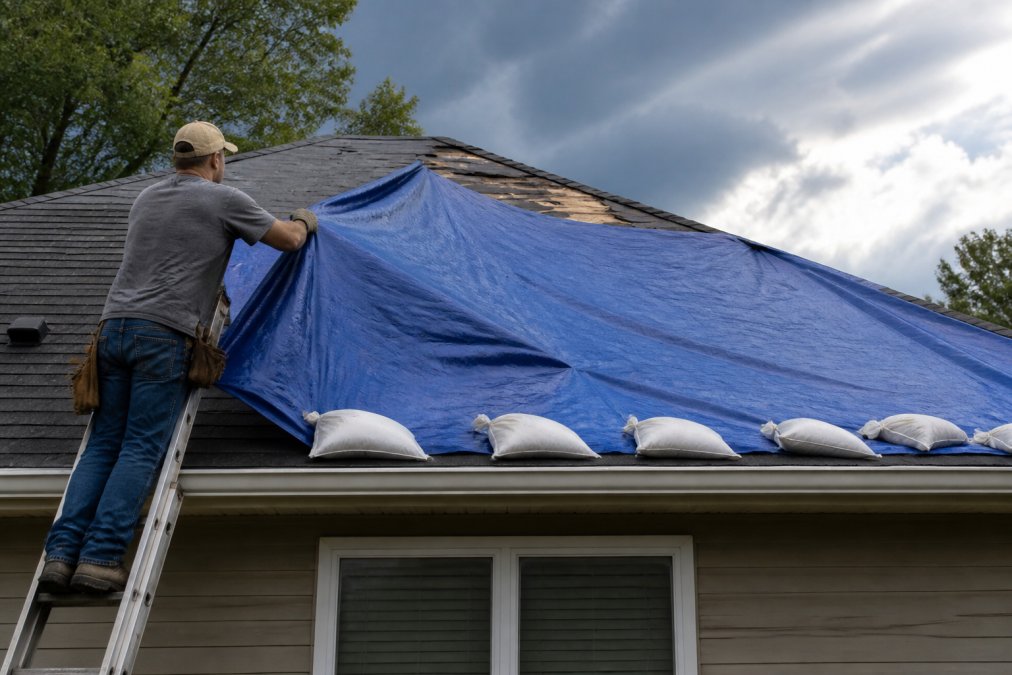
Spread the tarp over the damaged section, then place sandbags every 3-4 feet along all edges and across the ridge. On low-slope roofs, this holds well. The limitation is wind: sandbags shift in sustained gusts, and once one bag slides, the tarp starts flapping and the whole setup unravels. This is a stopgap for a night or two, not a two-week solution.
Fill sandbags only two-thirds full. Overfilled bags won’t conform to the roof pitch and slide more easily. Double-bagging adds durability for a few dollars.
Method 3: Roofing Nails With Neoprene Washers for High-Wind Areas
In exposed locations around Liberty Twp where storms bring sustained wind, standard nails pull through a tarp within hours. Roofing nails with neoprene washers hold because the rubber gasket compresses against the tarp and seals the penetration at the same time.
Use them with furring strips for the strongest mechanical hold. Drive nails every 6 inches along each batten, and keep fasteners at least 2 inches back from the tarp edge so the material doesn’t tear out. A box of these fasteners costs around $8, and it’s the single best upgrade you can make to a nailed-down tarp.
The honest downside: every nail is a new hole in your deck. Your roofer will need to address those during permanent repairs, so note where you drove them.
Method 4: Professional Roof Shrink Wrap for Long-Term Protection
Heat-sealed shrink wrap is what commercial property managers use when repairs are weeks away. A certified installer stretches a heavy membrane over the roof and shrinks it with a heat tool until it’s drum-tight against every slope and penetration.
Professional roof shrink wrap costs roughly $0.70 to $2.00 per square foot installed, which sounds steep until you compare it to interior water damage. It resists wind far better than any tarp, conforms to complex roof geometry, and lasts through repeated rain events while you wait on materials or an insurance decision. The catch is obvious: you can’t install it yourself. It requires equipment and training most homeowners don’t have.
Method 5: Emergency Roof Tarping Services in Cincinnati
When the damage is significant, the roof is steep, or you simply can’t get on a ladder safely, emergency roof tarping services in Cincinnati handle the job the same day. This is the option we recommend most often for two-story homes, metal roofs, and any situation involving structural damage.
A professional crew arrives with commercial tarps, proper fall protection, and the experience to identify where water is actually entering, which is often not where the visible damage is. They also document the damage with photos before covering it, and that documentation matters enormously when you file a claim.
Professional tarping protects the claim as much as the house. Insurers want evidence of mitigation, and a documented, properly installed tarp shows you acted responsibly.
For homeowners searching “roof tarping near me” after a storm, DGK Home Solutions offers free assessments and same-day emergency response across the Greater Cincinnati area.
Homeowners Insurance Roof Claim Process in Ohio
The homeowners insurance roof claim process in Ohio follows a predictable sequence, and understanding it prevents costly missteps. After you’ve tarped the roof, report the claim promptly, document everything with dated photos, and keep every receipt for emergency materials and labor.
Ohio policies typically cover sudden storm damage, but insurers distinguish between sudden events and gradual deterioration. That distinction is why documentation matters: a tarp installed within 24 hours, with photos of the damage underneath, supports your claim. A tarp installed two weeks later, after water has been entering the structure, invites questions.
Your adjuster will schedule an inspection, often within a few days. Be present if you can, and ask questions. The Ohio Department of Insurance consumer resources explains policyholder rights and the complaint process if a claim is disputed.
One thing most homeowners don’t realize: emergency mitigation costs are frequently reimbursable under the same claim. Save your receipts.
Safety Tips for Tarping a Roof After a Storm
Safety has to come before speed, because a fall from roof height is catastrophic and no tarp is worth it. Follow these rules every time:
- Wait until the storm has fully passed and surfaces are dry enough to grip
- Use a ladder rated for your weight, placed on level ground and secured
- Wear shoes with rubber soles and never work alone
- Stay at least 10 feet from power lines and any downed wiring
- Use a fall-protection harness on any roof steeper than 6:12 pitch
- Carry materials in a tool belt or haul them with a rope, never in your hands
If any of these conditions can’t be met, that’s your signal to call a professional. The CDC guidance on fall prevention is blunt about the consequences of working at height without protection.
Never walk on a roof that sags, feels spongy, or shows cracked decking. Storm-damaged sheathing can fail under a person’s weight without warning.
Storm damage rarely waits for a convenient moment, and a roof left exposed for even one rain event can turn a repair into a full replacement. If you’re in Liberty Twp or anywhere in the Greater Cincinnati area and need a roof tarped today, DGK Home Solutions offers free assessments, same-day emergency response, and full support through the insurance claim process. With over 20 years of experience and a team that handles projects of any size, we’ll give you an honest assessment of what your roof needs and get it protected fast. Get started with DGK Home Solutions and a free quote today.
Frequently Asked Questions
Is it safe to tarp a roof by myself after a storm?
Tarping a roof alone is risky because wet shingles are slippery, and wind gusts can throw you off balance. If you decide to do it, wait until the storm has fully passed, wear nonslip shoes, and never step on a damaged area. For steep pitches or heights over one story, call a professional. DGK Home Solutions offers 24/7 emergency service in the Greater Cincinnati area to handle it safely.
What materials do I need to tarp a roof properly?
You will need a heavy-duty polyethylene tarp large enough to cover the damaged area plus 4 feet of overhang, 2×4 wooden furring strips, roofing nails with neoprene washers, and a hammer. If you want to avoid nails, use sandbags or shrink wrap. Local hardware stores carry all of these, but a professional tarping service brings commercial-grade materials that last longer.
How long can a tarp stay on a roof before it needs professional repair?
A standard polyethylene tarp typically lasts 30 to 90 days, depending on sun exposure and wind. Shrink wrap can last 6 to 12 months. However, a tarp is only a temporary fix. Schedule a permanent repair as soon as your insurance claim is approved. DGK Home Solutions can assess the damage and provide a lasting solution.
Does homeowners insurance cover emergency roof tarping in Ohio?
Most Ohio homeowners policies cover emergency tarping if the damage is from a covered peril like wind or hail. Save your receipts and take photos before and after. File your claim promptly. DGK Home Solutions assists with the insurance claim process and can communicate directly with your adjuster to ensure tarping costs are included.
What is the best way to secure a tarp to a roof without damaging shingles?
The best non-damaging method is to use sandbags along the edges or shrink wrap, which requires no fasteners. If you must use nails, place them only through the wooden furring strips and seal with neoprene washers. Avoid nailing directly through the shingles. For historic or fragile roofs, call a professional who specializes in gentle tarping techniques.