Table of Contents
- What to Do Immediately When You Spot a Roof Leak
- How to Stop a Roof Leak from Inside
- How to Find a Roof Leak and Locate the Source
- Using a Roof Leak Tarp as a Temporary Solution
- Applying a Temporary Roof Patch
- Common Mistakes to Avoid During Emergency Repairs
- When to Call a Professional Roofer
- Frequently Asked Questions
Last Updated: October 4, 2026
What to Do Immediately When You Spot a Roof Leak
When you discover a roof leak, knowing how to temporarily fix a roof leak fast is essential for preventing water damage. Water damage spreads quickly and costs money. The first 24 hours are critical.
Stop the leak from getting worse. Move furniture and valuables away from the dripping area. Place buckets under the leak to catch water. If the leak is large, open windows to let moisture escape and prevent mold growth.
Check your attic or crawl space. Look for the source of the leak by going inside your home. Water stains on beams or insulation show you where water enters. Mark this spot so you can find it again from the roof.
Call a professional roofer if the leak is severe or if you’re not comfortable working at heights.
Document everything with photos and video. Take pictures of water stains, damaged areas, and the leak itself. This helps with insurance claims later. Write down when the leak started and what weather caused it.
How to Stop a Roof Leak from Inside
You can slow a roof leak from inside your home without climbing onto the roof. This temporary fix buys time while you arrange professional repairs.
Find the leak’s entry point in your attic. Water travels along rafters and beams before dripping into your home. Trace the wet path upward to find where water enters the roof. Mark this spot clearly.
Drill a small hole at the lowest point of the leak. This sounds odd, but it works. The hole lets water drain into a bucket instead of spreading through your ceiling. Place a bucket under the hole to catch drips. This prevents water from pooling and causing more damage.
Apply roofing cement to gaps and cracks around the leak area. Use a putty knife to push cement into openings. Let it dry completely before testing. This seals small holes temporarily but won’t fix major damage.
Cover damaged insulation with plastic sheeting. Wet insulation loses its ability to protect your home. Plastic prevents more water from soaking into the material. Secure the plastic with duct tape.
Remove standing water from your attic if possible. Use towels or a wet/dry vacuum to pull out water. This prevents rot and mold from spreading. Open vents to increase air circulation and speed drying.
How to Find a Roof Leak and Locate the Source
Finding the exact source of a roof leak takes patience. Water doesn’t always drip straight down. It travels along rafters and roof structure before entering your home.
Start in the attic on a sunny day. Look for light coming through holes in the roof. Sunlight shows you exactly where water enters. Mark these spots from inside so you can find them from the roof.
Follow water stains upward toward the roof peak. Stains point uphill to the leak source. Stains below the actual leak are misleading. Trace them carefully to avoid fixing the wrong spot.
Check around roof penetrations first. Leaks often occur where pipes, vents, and chimneys pass through the roof. These areas have gaps that let water in. Look for missing or damaged flashing around these openings.
Inspect the roof shingles above the leak location. Missing shingles, cracked shingles, and lifted edges all cause leaks. Shingles that are curled or blistered are failing. Granule loss (bare spots) means shingles are aging and won’t shed water properly.
Look for damaged flashing around valleys and edges. Flashing is metal that directs water away from vulnerable spots. Rust, gaps, and lifted flashing all leak. This is one of the most common leak sources.
Check seals around roof penetrations. Caulk and sealant deteriorate over time. Gaps form between the flashing and pipes or vents. These gaps let water run down inside the roof structure.
Using a Roof Leak Tarp as a Temporary Solution
A tarp stops water from entering your home while you arrange permanent repairs. This is how to temporarily fix a roof leak fast using a tarp.
Get a heavy-duty plastic or canvas tarp at least 8 feet by 10 feet. Smaller tarps won’t cover enough area. Buy ropes and fasteners to secure it. Work during daylight and dry weather.
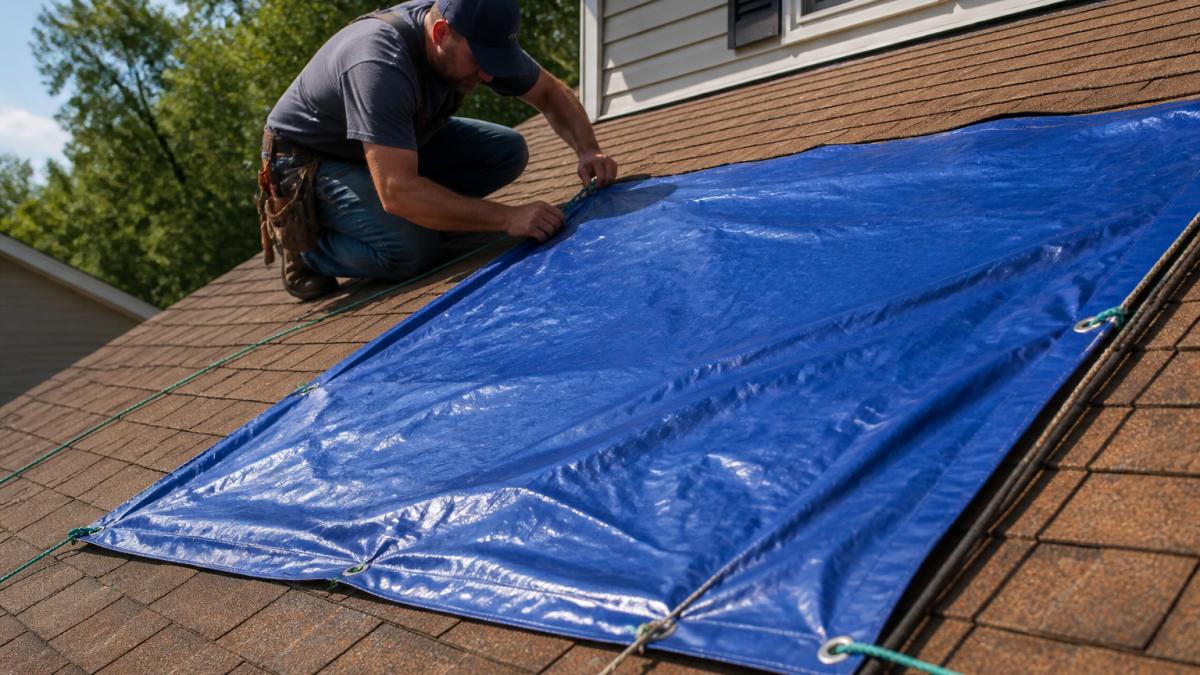
Tarp Placement and Securing Techniques
Position the tarp to cover the leak and extend at least 3 feet in all directions. The tarp should slope downward to shed water away from the leak area. Overlap the roof peak if possible so water runs down the other side.
Secure the tarp with ropes tied to sturdy anchor points. Use the roof’s existing structure like chimneys, vents, or ridge caps. Avoid puncturing the tarp with nails or screws. Holes in the tarp defeat the purpose.
Use bungee cords or ratchet straps to pull the tarp tight. A loose tarp flaps in wind and lets water underneath. Tighten it so water runs off cleanly without pooling.
Check the tarp daily. Heavy rain or wind can shift it. Make sure water still runs away from the leak. Tighten fasteners as needed.
Remove the tarp carefully when permanent repairs are done. Fold it and store it for future emergencies. A tarp buys you time but isn’t a permanent fix.
Applying a Temporary Roof Patch
Roof patches seal small holes and slow leaks. They’re not permanent but work for minor damage.
Clean the damaged area completely. Remove loose shingles, debris, and dirt. The patch needs bare roof surface to stick properly. Use a wire brush to roughen the surface.
Apply roofing cement generously to the cleaned area. Spread it with a putty knife. The cement should cover the hole and extend 2 inches beyond it in all directions.
Press a roof patch firmly into the cement. Hold it for 30 seconds. The patch should stick without wrinkles or air pockets. Smooth out bubbles with your hand.
Cover the patch edges with more roofing cement. This seals the edges so water can’t get underneath. Smooth the cement so it blends with the roof surface.
Let the patch cure for 24 hours before exposing it to rain. Don’t walk on it or apply pressure during this time. Check the patch after the first rain to make sure it’s holding.
Temporary patches last a few months to a year depending on weather. Plan for permanent repairs while the patch buys you time.
Common Mistakes to Avoid During Emergency Repairs
Rushing into repairs without finding the leak source wastes time and money. You might fix the wrong spot and leave the real leak untouched. Take time to locate the source correctly.
Don’t use roofing tape as your only fix. Tape peels off quickly and doesn’t seal properly. It’s better than nothing for a few days but won’t last. Combine it with cement or patches for better results.
Avoid walking on wet or icy roofs. Falls cause serious injuries. If conditions are unsafe, wait for better weather. A temporary bucket indoors is safer than a dangerous climb.
Don’t ignore small leaks hoping they’ll go away. Small leaks become big problems fast. Water damage spreads through wood and insulation. Mold grows in wet areas. Address leaks immediately.
Never patch over dirt or debris. The patch won’t stick and will fail quickly. Clean the area thoroughly before applying any sealant.
Don’t use interior caulk on roof repairs. Interior caulk isn’t waterproof and breaks down in sun and rain. Use roofing cement or roofing caulk designed for outdoor use.
Avoid temporary fixes that trap moisture. Plastic sheeting that seals an area completely can cause mold. Let air circulate around wet materials.
When to Call a Professional Roofer
Some roof leaks need professional attention immediately. Know when to stop the temporary fixes and call for permanent repairs.
Call a roofer if the leak is large or if water is pouring into your home. Temporary fixes won’t handle major damage. Professional equipment and expertise stop large leaks properly.
Call if the leak is in a hard-to-reach spot or if the roof angle is steep. Working at heights is dangerous. Professionals have safety equipment and experience. A fall from a roof causes serious injury.
Call if you’ve patched the leak but water still drips. The real source might be elsewhere. A roofer has tools and experience to find hidden leaks.
Call if multiple leaks appear. This suggests widespread roof failure. The entire roof may need replacement, not just a patch.
Call if the roof is old or shows signs of major damage. Shingles that are cracked, curled, or missing indicate the roof is failing. Temporary patches won’t solve this. Permanent repair is necessary.
Contact DGK Home Solutions for professional roof repairs. We assess damage quickly and provide honest recommendations. Our team handles storm damage, insurance claims, and permanent solutions. We pride ourselves on clear communication and stress-free processes. Whether you need temporary fixes or full roof replacement, we’re here to protect your home.
Frequently Asked Questions
How do you temporarily stop a roof leak?
Start by moving water away from the leak source inside your home using buckets or tarps to catch drips. From outside, apply roofing cement or a temporary patch kit over the damaged area, then secure a tarp over the problem zone using rope or clips. These measures buy time until a professional can perform a permanent repair. Temporary fixes typically last days to a few weeks depending on weather conditions.
Can I patch a roof leak from inside the house?
Yes. Use roofing sealant or caulk to seal gaps around the leak from the attic or crawl space if accessible. Place buckets to catch water and improve ventilation to reduce moisture buildup. However, interior patches address symptoms, not the root cause. You still need exterior repairs to permanently stop the leak. Interior measures are emergency steps only, not long-term solutions.
How long can a temporary roof leak repair last?
A temporary patch or tarp typically holds for a few days to several weeks, depending on weather, roof pitch, and repair method. Heavy rain, wind, or temperature swings reduce durability. Roofing cement patches may last longer than tarps in dry conditions. Schedule professional repairs within 1-2 weeks to prevent water damage from worsening and avoid voiding insurance claims by delaying proper fixes.
Is it safe to put a tarp on a leaking roof?
Yes, if installed correctly. Use a heavy-duty tarp (at least 6 mil thickness), secure it with rope or roof clips, and ensure it extends at least 4 feet beyond the damaged area in all directions. Avoid walking on wet tarps. Never work on a roof during rain, high winds, or if you’re uncomfortable with heights. If you’re unsure, wait for a professional, temporary solutions aren’t worth the safety risk.
Roof leaks demand fast action, but temporary fixes only buy time. Water damage spreads quickly through walls, insulation, and wood framing. Professional repair stops the leak permanently and prevents costly damage. DGK Home Solutions provides 24/7 emergency roof repair services across Liberty Twp and beyond. With over 20 years of experience, we deliver top-quality materials and honest assessments. Get your free quote today and protect your home from water damage.