Table of Contents
- Understanding the Causes of Sagging Roof
- Assessing Structural Integrity Before Fixing Sagging Roof Lines
- Roof Structural Repair: When to DIY vs. Call a Professional
- Attic Roof Support: Reinforcing Rafters and Trusses
- Replacing Rotted Roof Decking and Sheathing
- Working with a Professional Roofing Contractor
- Common Mistakes to Avoid When Fixing Sagging Roof Lines
- Conclusion
Last Updated: July 20, 2026
Understanding the Causes of Sagging Roof
A sagging roofline signals that your home‘s structural integrity is at risk. Sagging roofs develop over months or years as stress accumulates on the structural system. The weight of snow, ice, and rain combined with the dead load of the structure itself can exceed what the rafters, trusses, and load-bearing walls can support.
The most common culprit is inadequate structural support. Older homes, particularly those built before modern building codes, often have undersized rafters or insufficient bracing. A roof framed with 2×6 rafters spaced 24 inches apart in 1975 wasn’t designed for today’s snow loads and building code requirements.
Structural Failure vs. Cosmetic Sagging
Not all roof sags are created equal. A cosmetic sag is minor settling that doesn’t compromise structural integrity, unsightly but not dangerous. A structural sag indicates active failure under load, where the roof system deflects seasonally and stress accumulates in the framing.
Cosmetic sagging occurs in older homes where framing has settled evenly over decades. The roof pitch changes slightly, but the structure remains sound.
Structural sagging is the emergency scenario. Signs include cracked drywall at interior walls, separation between walls and ceilings, doors that stick or won’t close, and visible gaps opening between roof sheathing and walls. According to structural engineering guidelines from the American Society of Civil Engineers, active deflection beyond 1/240th of the span indicates the roof requires reinforcement.
Common Warning Signs
Visual warning signs are easiest to spot. Look at your roofline from the street, does it sag visibly in the middle? Check the eaves for levelness. In your attic, use a stringline to check for deviation from straight.
Structural warning signs are more serious. Diagonal cracks radiating from corners indicate frame movement. Gaps between ceiling and walls suggest the roof is sagging while walls remain plumb. Performance-related signs include doors and windows that stick, squeaking or creaking sounds when wind blows or snow accumulates, and water stains appearing after heavy rain despite intact shingles.
Assessing Structural Integrity Before Fixing Sagging Roof Lines
Before fixing a sagging roof, you need to understand exactly what you’re dealing with. Is the sag uniform across the entire roof or concentrated in one area? Is the roof actively deflecting under load or settled into a stable but misaligned position?
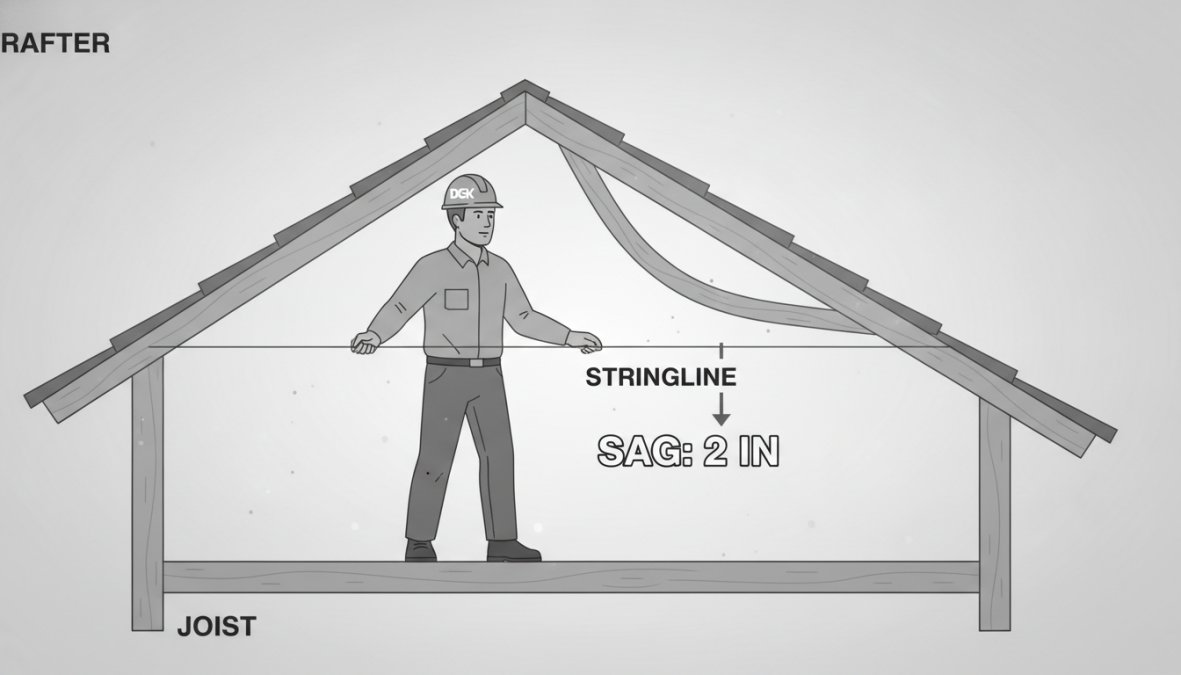
Visual Inspection Techniques
Walk through your attic on a clear day with natural light. Look at the ridge beam, does it run straight or sag in the middle?
Examine collar ties (horizontal braces connecting opposing rafters) for damage, rot, or failure. Inspect the roof sheathing and decking for visible sag or separation from rafters, indicating active structural movement.
Check connections where rafters meet the top plate of the wall for gaps. Look for visible cracks in wood members, large cracks running perpendicular to the grain or cracks at connection points indicate structural stress.
Using a Stringline for Accurate Measurement
A stringline is your most reliable tool for quantifying roof sag. Tie the string tightly between two points at the ends of the ridge beam under enough tension to be perfectly straight.
At the midpoint, measure the vertical distance from the string down to the actual ridge beam. For a 40-foot roof span, a sag of 2-3 inches is within acceptable limits. A sag of 6 inches or more indicates structural concern.
Take measurements at several points along the roof. Is the sag uniform or localized?
Uniform sag suggests the entire roof system has settled evenly. Localized sag suggests a concentrated load or failure point.
According to International Building Code requirements for roof deflection, maximum allowable deflection under live load is typically 1/240th of the span. For a 40-foot span, that’s about 2 inches. If your measurement exceeds this, the roof requires reinforcement.
Roof Structural Repair: When to DIY vs. Call a Professional
The decision to tackle roof structural repair yourself or hire a professional depends on severity of the sag, your experience level, and local building codes. If stringline measurement shows sag within 2-3 inches of acceptable limits and the sag is uniform, you may handle temporary shoring and reinforcement yourself.
However, if sag exceeds 4-5 inches, is localized to one area, or shows signs of active structural movement, you need a structural engineer and licensed contractor. A structural engineer’s assessment costs 500 to 1,500 dollars. Licensed contractor reinforcement work might run 3,000 to 8,000 dollars or more.
Safety Precautions for Roof Work
If working on roof structural repair, safety is non-negotiable. Wear a safety harness rated for fall protection whenever working at height. Anchor the harness to a structural member rated for at least 5,000 pounds of force, not gutter systems. Wear non-slip footwear with good tread and work during daylight hours. Never work alone.
Use proper scaffolding or ladders. A ladder should extend at least 3 feet above the roof line and be angled so the base is 1 foot away from the wall for every 4 feet of height. Inspect all tools and equipment before use. Be aware of electrical hazards and maintain at least 10 feet of clearance from power lines.
Working on a sagging roof without proper assessment and reinforcement can lead to structural collapse during the repair process itself. Always have a structural engineer evaluate the situation before beginning work.
Attic Roof Support: Reinforcing Rafters and Trusses
Once you’ve assessed the sag and determined that reinforcement is needed, the goal is to add support to the existing roof system. The most common approach is reinforcing existing rafters or trusses rather than replacing them entirely.
Step-by-Step Temporary Shoring Guide
Temporary shoring uses vertical posts to support the roof from below, taking load off stressed structural members. Assess the load path to determine where roof load is concentrated. Load travels from the roof deck through rafters to the top plates of walls. Support this load path with posts that transfer weight to the foundation.
Prepare the foundation by ensuring shoring posts rest on solid, level surfaces. For dirt or gravel, create a solid base using a 2×12 or larger beam laid flat.
Build posts using 4×4 posts or doubled 2×8 members. Posts should be vertical, plumb, and cut to length so they fit snugly between floor and roof framing. Add diagonal bracing (typically 2x4s) from the base of each post to adjacent posts, preventing posts from tilting or shifting laterally.
Secure bracing with bolts or lag screws, not nails. Once shoring is in place, monitor the roof for additional movement. Temporary shoring typically takes 2-3 days to install and costs 1,500 to 3,000 dollars.
Permanent Structural Reinforcement
Permanent reinforcement involves adding new structural members that carry roof load indefinitely. Sistering rafters means installing new rafters alongside existing ones. A new 2×8 or 2×10 rafter is bolted to the side of each existing rafter. Bolts should be spaced every 16 inches with washers to prevent pulling through the wood.
Installing a new ridge beam addresses the root cause of many sagging roofs. An old roof may have been framed with rafters meeting at a ridge board, a non-structural member.
A ridge beam is a true load-bearing member carrying downward thrust from rafters. Replacing a ridge board with a structural ridge beam significantly increases roof capacity. The new beam must be sized correctly, usually a 4×10 or larger, and supported at each end by a load-bearing wall or post.
Adding collar ties and bracing prevents rafters from spreading outward under load. Collar ties are horizontal members connecting opposing rafters near the peak. If your attic lacks adequate collar ties or bracing, adding them is relatively simple and inexpensive.
When reinforcing rafters, use galvanized or stainless steel hardware. Standard steel bolts will rust over time, especially in damp attics. Rust weakens the connection and defeats the purpose of reinforcement.
All permanent reinforcement work should follow local building codes. Many jurisdictions require a structural engineer’s stamp on reinforcement plans.
The engineer calculates required size and spacing of new members based on your specific roof load, span, and local snow load requirements. This engineering work typically costs 800 to 1,500 dollars but ensures the repair is correct and will pass inspection.
Replacing Rotted Roof Decking and Sheathing
If your roof sag is accompanied by soft spots in the roof decking, water stains, or visible rot, you’re dealing with a more complex problem. Rotted decking has lost structural capacity and must be replaced.
Before replacing decking, identify and fix the moisture source. If you replace rotted decking without addressing the leak or ventilation problem, the new decking will rot again within years. Replacing roof decking is labor-intensive. For a typical 2,000-square-foot roof with moderate rot, expect 5-7 days of work and costs ranging from 8,000 to 15,000 dollars.
When new decking is installed, use exterior-grade plywood or OSB with proper nailing patterns. Nails should be spaced 6 inches apart around the perimeter of each sheet and 12 inches apart in the field. Ensure the attic has adequate ventilation. Roof vents, soffit vents, and ridge vents should provide continuous air circulation to prevent moisture accumulation that leads to rot.
Working with a Professional Roofing Contractor
A qualified roofing contractor should have a structural engineer on staff or a working relationship with one. They should assess your roof, explain the problem clearly, and recommend appropriate solutions.
They should provide a detailed written estimate breaking down labor, materials, and timelines. They should carry liability insurance and workers’ compensation insurance and be licensed in your state with references from recent projects.
When interviewing contractors, ask about experience with roof structural repair specifically. Ask for references and call them. Ask whether work was completed on time and on budget, whether the contractor was responsive, and whether any issues arose after completion.
Insurance and Permit Implications
Before beginning any roof structural repair, contact your homeowner’s insurance company. Major structural work often requires a building permit, and the permit process involves inspection by the local building department. If you complete major structural work without a permit, your insurance may deny claims related to that work.
Many insurance companies will cover roof structural repair if damage resulted from a covered event like a storm or tree damage. If your roof is sagging due to age and inadequate original design, insurance may not cover the repair.
However, if the sag was accelerated by a covered event, insurance may contribute. A building permit typically costs 200 to 500 dollars. The permit process adds 2-4 weeks to the project timeline but prevents larger problems later, denied insurance claims, failed inspections, or complications when selling your home.
Always obtain permits and insurance approval before beginning roof structural repair. The cost and time investment upfront prevents far larger problems later.
Common Mistakes to Avoid When Fixing Sagging Roof Lines
Ignoring early warning signs. A small sag you decide to monitor "for now" often becomes a major problem within 3-5 years. Get a professional assessment immediately if you notice a visible sag or interior signs like cracked drywall.
Attempting structural repair without professional guidance. Roof framing is complex. Adding new members, installing shoring, or removing support requires understanding load paths, building codes, and structural mechanics. A well-intentioned DIY attempt can make the problem worse.
Confusing roof replacement with structural repair. Some homeowners assume replacing roof shingles will fix a sagging roof. It won’t. The structural issue must be fixed first.
Neglecting the moisture problem. Many sagging roofs are accompanied by rot from leaks or poor ventilation. If you reinforce the framing but don’t address the moisture source, rot will continue and new reinforcement members will rot just like the old ones.
Proceeding without a structural engineer’s assessment. If your stringline measurement shows sag exceeding 3-4 inches or you see signs of active structural movement, you need a structural engineer. An engineer calculates required reinforcement and ensures your repair will be adequate.
Skipping permits and inspections. Unpermitted work creates liability and can result in denied insurance claims. Permits and inspections are protection, ensuring the work is done correctly and providing documentation that protects you and future owners.
Using incorrect fasteners and materials. When sistering rafters or installing new framing members, use galvanized or stainless steel bolts, not standard steel. Use structural-grade lumber, not construction lumber.
Conclusion
Fixing sagging roof lines safely requires a systematic approach: assess the problem accurately, understand whether you’re dealing with cosmetic or structural sag, determine whether reinforcement or replacement is needed, and execute repairs that comply with building codes and insurance requirements.
A sagging roof is not a cosmetic issue to ignore. It’s a structural problem that worsens over time.
The longer you wait, the more expensive and disruptive the repair becomes. If you’ve noticed a visible sag in your roofline in the Greater Cincinnati region, contact DGK Home Solutions for a professional assessment.
Our team has over 20 years of experience evaluating and repairing roof structural problems. We provide honest assessments, handle insurance claims, and ensure repairs meet local code requirements. Get a free quote today and protect your home’s structural integrity before the problem becomes critical.
Frequently Asked Questions
What causes a roof line to sag and how do I know if it's dangerous?
Sagging roof lines result from several causes: rotted roof decking and sheathing, inadequate rafter or truss support, moisture damage, foundation settlement, or excessive snow load exceeding the structural design. Not all sagging is dangerous, cosmetic sagging (under 1/4 inch over 20 feet) may be aesthetic only.
However, structural sagging indicates failing load-bearing components and poses collapse risk. Signs of dangerous sagging include visible interior ceiling dips, cracked drywall, doors that won't close, and water stains indicating rot. A structural engineer can definitively assess whether your roof presents safety concerns.
Can I fix a sagging roof myself, or do I need a professional roofing contractor?
Minor cosmetic issues may be addressable with temporary shoring, but permanent fixes require professional expertise. Structural repairs involve building code compliance, load calculations, and safety protocols that demand licensed contractors or structural engineers.
DIY work risks catastrophic failure, injury, and voided insurance. A professional roofing contractor brings proper tools, fall protection equipment, building permits, and structural knowledge. Even temporary shoring, the safest DIY option, requires precise calculations and should be inspected by a professional before permanent work begins.
What permits and insurance considerations apply to roof structural repair?
Roof structural repairs almost always require building permits, especially when reinforcing rafters, replacing roof decking, or installing permanent shoring. Unpermitted work can void your homeowner's insurance and create liability issues during home sales.
Many insurance policies cover structural failures from covered perils (like snow load or storm damage) but may deny claims if repairs weren't permitted. Document all work with your insurance company and contractor. A professional roofing contractor handles permit applications and ensures work meets current building codes, protecting your investment and compliance.
How do I temporarily shore a sagging roof safely until permanent repairs are made?
Temporary shoring uses adjustable posts (typically 4×4 lumber or adjustable steel posts) placed in the attic to support the sagging area. Posts must sit on solid foundation beams, not joists.
Install posts with proper nailing patterns and framing glue, spacing them 4-6 feet apart perpendicular to the sag direction. Use a stringline to measure sag depth and adjust posts gradually (1/4 inch per week) to avoid sudden structural shock.
Never attempt shoring without professional guidance, improper installation can cause new structural problems or collapse. Always wear safety harnesses and fall protection when working at height.
This article was written using GrandRanker