Table of Contents
- What Are Ice Dams and Why They Form on Ohio Roofs
- Step 1: Upgrade Attic Insulation for Ice Dams in Ohio
- Step 2: Install Proper Roof Ventilation for Ice Dams
- Step 3: Seal Air Leaks in Your Attic
- Step 4: Clean and Maintain Gutters and Downspouts
- Step 5: Remove Snow and Install Gutter Heating Cables in Ohio
- Step 6: Professional Ice Dam Removal in Ohio
- Step 7: Create a Seasonal Prevention Checklist for Ohio Winters
How to Prevent Ice Dams on Roofs in Ohio: 7 Steps
Last Updated: July 24, 2026
Ice dams are one of the most costly winter problems Ohio homeowners face, yet they’re entirely preventable with the right approach. At DGK Home Solutions, we’ve spent over 20 years helping homeowners across the Greater Cincinnati area stop ice dams before they cause water damage, mold, and structural issues. Warm air escaping from your attic melts snow on the upper roof, water runs down and refreezes at the cold eaves, and within days you’ve got a dam that traps meltwater behind it. Below are seven concrete steps that actually work, starting with the most important one: fixing your attic.
What Are Ice Dams and Why They Form on Ohio Roofs
An ice dam is a ridge of ice that forms along the eaves of a roof, trapping meltwater and forcing it to back up under shingles and into the home, causing leaks, water stains, mold growth, and structural damage.
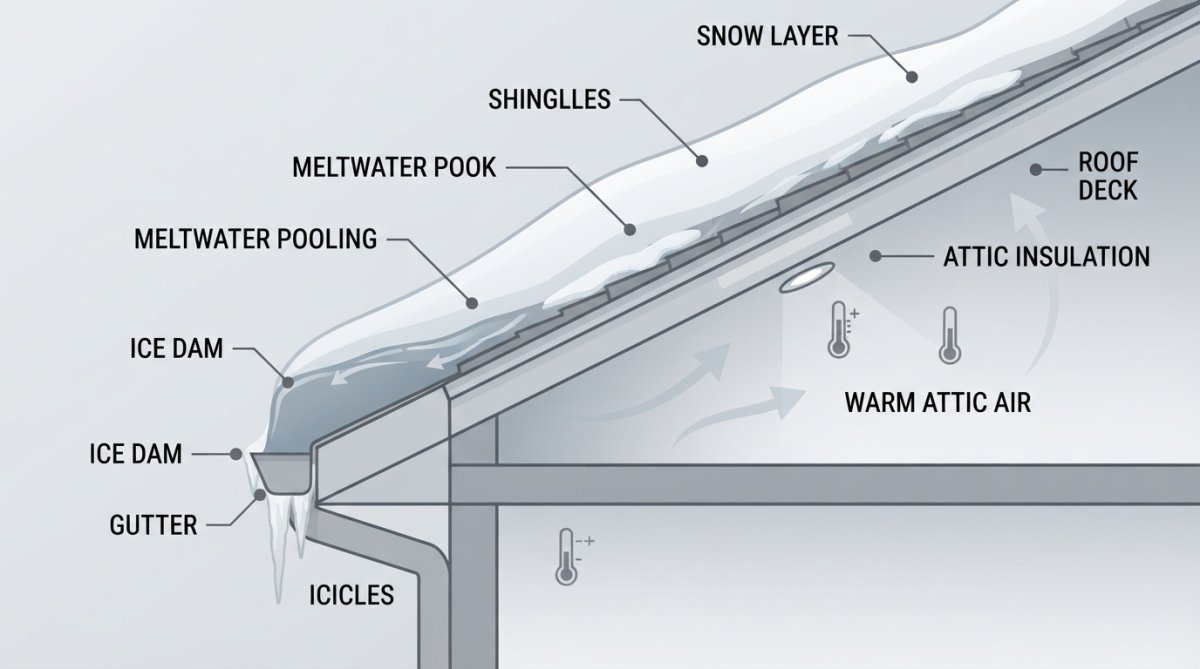
Heat from your home escapes upward through the ceiling. If your attic isn’t properly insulated or ventilated, that warm air heats the roof deck. Meanwhile, the eaves stay cold because they overhang the exterior walls and receive no heat from below. The warm roof section melts snow, water runs down, hits the cold eaves, and freezes solid. Ohio’s frequent freeze-thaw cycles make this worse, building ice dams thick and fast.
Meltwater that can’t flow off the roof backs up under your shingles, into your underlayment, through your roof deck, and eventually into your attic insulation and drywall. By the time you notice ceiling stains, the dam has been working for weeks. Prevention matters more than removal.
The real indicator of an ice dam problem isn’t ice itself, it’s whether water is backing up behind it. A thin ice ridge along the eaves is normal. A thick dam with water pooling visibly behind it is the emergency.
Step 1: Upgrade Attic Insulation for Ice Dams in Ohio
This is where ice dam prevention actually begins. You cannot prevent ice dams without addressing heat loss from your attic.
Most Ohio homes built before 2000 have dangerously low insulation levels. The recommended R-value for attic insulation in Ohio is R-38 to R-49. Many older homes have R-19 or R-25. Check your current R-value by measuring insulation depth in your attic. If you see less than 10-12 inches of fiberglass or cellulose, you need more. Fiberglass batts provide roughly R-3.2 per inch; cellulose blown-in insulation delivers R-3.6 per inch.
If you’re comfortable in an attic, adding blown-in cellulose yourself is possible. You can rent a cellulose blower from home improvement stores for one day’s rental cost. Professional installation costs more upfront but guarantees proper coverage, correct depth, and no gaps around penetrations. For most homeowners in Liberty Twp and the Greater Cincinnati area, professional installation is worth the investment.
A properly insulated attic reduces heat loss by 40-50%, which directly stops the warm roof condition that creates ice dams.
Never add insulation directly over recessed lights or other heat-producing fixtures without proper ventilation covers. These fixtures generate heat and can overheat if insulation blocks airflow, creating a fire hazard.
Step 2: Install Proper Roof Ventilation for Ice Dams
Ventilation works with insulation to keep your attic cold in winter and cool in summer. A proper ventilation system has soffit vents along the eaves and ridge vents at the peak. Cold outside air enters through soffit vents, flows across the attic floor, and exits through ridge vents. This continuous air movement keeps the attic temperature close to the outside temperature, preventing the warm-roof condition.
Many Ohio homes have ridge vents but no soffit vents, or vice versa. A one-way system doesn’t work. Check your soffit from outside for small perforations or openings. If your soffit is solid with no vents, that’s a problem. Look at your roof peak from a distance. A ridge vent runs the full length and looks like a thin raised line.
Adding ventilation requires roofing work best done by professionals. However, if you already have vents installed, make sure they’re not blocked. Snow, ice, debris, or birds’ nests can clog soffit vents and stop airflow. Clear any obstructions you find.
Step 3: Seal Air Leaks in Your Attic
Even with good insulation and ventilation, air leaks will undermine your efforts. Warm air escapes through gaps around pipes, wires, ductwork, and attic hatches.
Common Air Leak Locations
- Attic hatches and doors: These are notorious for being poorly sealed. If you can feel air movement or see light around the edges, it leaks.
- Duct penetrations: HVAC ducts that run through the attic often have gaps where they pass through the ceiling below.
- Ceiling light fixtures: Recessed lights are designed to emit heat downward, but gaps around them let warm air into the attic.
- Plumbing vents and exhaust fans: These penetrations are rarely sealed tightly.
For accessible leaks, caulking and spray foam are your primary tools. Weatherstripping around attic hatches costs $20-40 and takes 20 minutes to install. Caulk around pipe penetrations with polyurethane caulk, which remains flexible in temperature swings. For larger gaps, spray foam is more effective, but use it carefully to avoid blocking ventilation.
A single unsealed attic hatch can leak as much warm air as leaving a window open all winter. Seal this first, it’s the highest-impact, lowest-cost air leak fix.
Step 4: Clean and Maintain Gutters and Downspouts
Clean gutters allow meltwater to drain away from your home and prevent ice from damaging your gutters and fascia. When gutters are clogged with leaves and debris, water can’t flow. During freeze-thaw cycles, water sitting in gutters turns to ice, which expands and damages the gutter itself.
Clean your gutters twice a year: once in fall after leaves drop, and once in early spring before the heavy melt season. Fall cleaning is critical in Liberty Twp because oak leaves accumulate heavily. When cleaning, pay special attention to downspouts. They should extend at least 4-6 feet away from your foundation. Check for debris inside downspouts too. Leaves and sediment can compact and block water flow completely.
Step 5: Remove Snow and Install Gutter Heating Cables in Ohio
Once you’ve addressed insulation, ventilation, air leaks, and gutters, snow removal and heat cables are your second line of defense for active winter management.
Using a Roof Rake Safely
A roof rake is a long-handled tool that lets you pull snow off the lower 3-4 feet of your roof from the ground. Pull snow off the section above the eaves where ice dams form to reduce the amount of water available to melt and refreeze. Use gentle, pulling motions rather than scraping. Don’t stand directly under the area you’re raking. Wear a hard hat and work on clear days.
Heat Cables and Heat Tape
Gutter heating cables (heat tape) are electric cables that run along your gutters and downspouts. When temperatures drop, the cable heats up, melting ice and allowing water to drain. Heat cables cost $100-300 for materials and installation but consume electricity continuously during freezing weather and require annual maintenance. They only work on gutters and downspouts, not the root cause of the ice dam.
Think of heat cables as a temporary band-aid while you implement the four steps above. Once your attic is properly insulated and ventilated, you shouldn’t need them.
Never install heat cables without proper electrical grounding. Improper installation can create shock hazards, especially if water is present. Hire a licensed electrician if you’re not experienced with outdoor electrical work.
Step 6: Professional Ice Dam Removal in Ohio
If you already have an ice dam forming, removal becomes necessary to prevent water damage. DIY ice dam removal is risky. Chipping at ice with a hammer can crack shingles and damage flashing. Pouring hot water on ice can cause thermal shock to shingles.
Call a professional if water is actively leaking into your home, the ice dam is thick, you’re uncomfortable working at heights, or you’ve tried removal without success. Professional removal typically uses steam or calcium chloride. Steam melting uses hot water vapor to soften ice without thermal shock. Calcium chloride is applied in mesh socks along the dam and melts ice chemically without damaging shingles.
At DGK Home Solutions, we handle ice dam emergencies across the Greater Cincinnati area. Our team can remove existing dams safely while assessing whether your insulation and ventilation are adequate. Emergency ice dam removal typically costs $300-800 depending on dam size and accessibility. If water damage has occurred, restoration costs can climb into thousands. Prevention is far cheaper than removal.
Step 7: Create a Seasonal Prevention Checklist for Ohio Winters
The best ice dam prevention is systematic and seasonal. Use this checklist to stay ahead of the problem.
Fall Preparation (September-October)
- Clean gutters and downspouts thoroughly. Remove all leaves and debris.
- Inspect soffit and ridge vents for blockages. Clear any debris or ice from previous winter.
- Check attic insulation depth. If less than R-38, plan an upgrade before winter.
- Seal visible air leaks around attic penetrations (pipes, ducts, lights).
- Inspect attic hatch for gaps. Add weatherstripping if needed.
- Trim tree branches overhanging your roof. They collect snow and block gutters.
Winter Monitoring (November-March)
- After heavy snow, use a roof rake to pull snow off the lower eaves.
- Monitor weather forecasts. If temperatures will rise above freezing, remove snow preemptively.
- Check gutters after ice storms. Clear any ice or debris blocking downspouts.
- Look for water stains on ceilings or attic insulation. These indicate a leak or ice dam forming.
- If an ice dam forms, contact a professional for removal rather than attempting DIY methods.
Spring Inspection (April-May)
- Once snow has melted, inspect your roof for damage. Look for missing shingles, damaged flashing, or water stains.
- Check attic insulation for water damage or mold. If you see discoloration, address it immediately.
- Inspect gutters and downspouts for damage from ice dams. Replace any sections bent or cracked.
- Verify that soffit and ridge vents are clear and functioning.
| Task | Timing | Frequency | Priority |
|---|---|---|---|
| Clean gutters and downspouts | Fall and spring | 2x per year | High |
| Inspect soffit and ridge vents | Fall and spring | 2x per year | High |
| Seal attic air leaks | Fall | 1x per year | High |
| Check attic insulation depth | Fall | 1x per year | High |
| Remove snow from eaves | After heavy snow | As needed | Medium |
| Inspect roof for damage | Spring | 1x per year | Medium |
| Trim overhanging branches | Fall | 1x per year | Medium |
Ice dams are preventable, but prevention requires addressing the root cause: heat loss from your attic. If you’ve tried removing ice dams repeatedly or you’re seeing water damage each winter, your insulation and ventilation need attention. DGK Home Solutions specializes in comprehensive ice dam prevention, from upgrading insulation to R-38 or higher, installing proper soffit and ridge ventilation, and sealing air leaks around attic penetrations. Our team has helped hundreds of homeowners across the Greater Cincinnati area stop ice dams permanently. Contact us for a free assessment of your attic and a clear plan to protect your home this winter.
Frequently Asked Questions
What causes ice dams on roofs in Ohio?
Ice dams form when heat from your attic melts snow on the roof, causing meltwater to refreeze at the colder eaves. This happens due to inadequate attic insulation, poor ventilation, and air leaks that allow warm air to escape into the attic space. Ohio's freeze-thaw cycles make this especially common during winter months when daytime temperatures rise above freezing but nights drop well below.
How effective are gutter heating cables for preventing ice dams in Ohio?
Heat cables and heat tape can provide temporary relief by melting channels through existing ice dams, allowing meltwater to drain. However, they are not a permanent solution and require annual installation before winter. They work best as a supplementary measure alongside proper attic insulation, ventilation, and air sealing. For long-term ice dam prevention in Ohio, address the root cause, heat loss from your attic.
What R-value insulation do I need to prevent ice dams in Ohio?
Ohio homeowners should aim for R-38 to R-49 in attic insulation, depending on your specific location and climate zone. The exact recommendation depends on your current insulation level and roof design. A professional energy audit can determine your home's specific needs. Upgrading insulation is one of the most effective long-term investments to prevent ice dams and reduce heating costs.
Does homeowners insurance cover ice dam damage in Ohio?
Most standard homeowners insurance policies do not cover ice dam damage, as it is considered a result of poor home maintenance. However, damage caused by ice dams, such as water leaks, mold growth, or structural damage, may be covered under certain circumstances. Review your policy and contact your insurer directly. Taking preventive steps now can help you avoid costly damage and potential claim denials.
This article was written using GrandRanker